Saturday, January 26, 2013

Mustard Milanese Chicken


It is not often that I make a recipe for dinner and run to my computer to immediately blog about it. I ate this less than an hour ago and here I am, kitchen cleaned up, photos edited, and blog entry in progress. That should tell you that this is a special one.

This recipe comes from The Smitten Kitchen Cookbook, which is probably the best Christmas present I got this year. The recipes on Deb's blog are always brilliant, so I expected no less from her book, but it is much more than that. Even as I sit down to write this post, I find myself lovingly flipping through the pages, sighing over the gorgeous photography and engagingly-written recipe intros. I want to make every single recipe (even the ones with ingredients I don't normally eat, like fish). So far I've made four recipes from the book in the two and a half weeks I've had it at home, which is undoubtedly the fastest I've ever gotten into a cookbook. Everything I've made has been wonderful.

This recipe stood out to me because of the gorgeous picture. Honestly, it's just a piece of chicken, breaded and fried. I recognized that when I noted the recipe on my mental must-do list, but something about it called to me, and I'm glad it did.

You see, while I pretend to be all bad-ass in the kitchen with my fancy food blog, when it comes to breading and frying meat, I sit back and leave things to Jeff. My husband is brilliant at this. When he asked me to put chicken parm on the menu this week (which is one of his specialties), I showed him this recipe and got him to redirect his enthusiasm. Chicken parm is great and all, but why douse a perfectly crisp, golden-brown breading in tomato sauce if you don't have to? Jeff executed this recipe perfectly, pounding the chicken thin, breading it and crisping it to golden perfection in the pan. The chicken was crunchy on the outside while staying moist and succulent on the inside. The mustard and lemon juice in the batter added a delicate zing to what appeared to be an ordinary chicken dish.

I'm glad we have leftovers, because (as Jeff so astutely observed during dinner) this will make one hell of a sandwich for lunch tomorrow.

Mustard Milanese Chicken
Adapted from The Smitten Kitchen Cookbook.

2 boneless, skinless chicken breasts
salt and pepper
1/3 c flour
2 eggs
4 tbsp Dijon mustard
4 cloves garlic, minced
2 tsp dried oregano
1 tsp lemon zest
2 c panko breadcrumbs
canola oil for cooking
lemon slices, for garnish

Lay one chicken breast on a cutting board, cover it with plastic wrap and pound it to 1/4" thickness with a meat pounder (you don't want a spiky tenderizer because it will flay your plastic wrap to shreds). Slice into relatively equal thirds. Repeat with the other chicken breast. Season the chicken with salt and pepper.


Add about 1/4" of oil to a large skillet and heat over medium-high.

Arrange three large plates or shallow containers on your counter. Add the flour to the first and the panko to the third (we advise only adding a small amount at a time, to reduce waste at the end). Whisk together the eggs, mustard, garlic, oregano and lemon zest and add them to the second container (you will have more than is pictured below - the original recipe called for half this quantity, but because we cut our chicken into more pieces, we ran out halfway through).

Dredge each piece of chicken lightly in the flour, then in the egg mixture, then coat well with panko, patting it into any naked crevices.


Carefully lay the breaded chicken in the hot oil. Cook 3-4 minutes per side, until golden-brown. Continue to dredge the rest of the chicken as these cook. As each piece is done, remove it to a paper bag or folded up paper towel to drain. (You may need to replenish your oil for subsequent batches of chicken - if so, make sure it gets nice and hot before adding any more chicken to the pan!)


Serve with lemon slices and a nice salad. Drizzle your chicken with a small squeeze of lemon juice before enjoying!

Friday, January 25, 2013

Philly Restaurant Week: Cuba Libre


I'm a little hesitant to share this with all of you. The fact that Jeff and I, by ourselves, consumed all of this food - practically licking our plates clean - makes me feel like a bit of a glutton. But it was sooooo good!

It's Restaurant Week in Philly again. After sifting through a list of mediocre-looking menus, I discovered the mouth-watering offerings of Cuba Libre in Old City. Everything on the menu looked delicious. Jeff and I were chomping at the bit to get down there and try it.

We ventured down to Philly through the bitter cold Wednesday night. We found on-street parking nearby ($3.50 to park for an hour and a half? Things like this are why Philly kicks New York's butt, in my humble opinion) and hustled over the cobblestones to the restaurant. It was so bitterly cold out, my teeth were chattering after our three block walk. But upon entering Cuba Libre, we were transported into the tropics. The decor is awesome - made to look like a plaza in the streets of Havana (ok, probably a Disney-fied version, but it worked for me). We quickly forgot the cold and settled into debating our menu selections.

The restaurant week menu was incredibly generous - two small plate appetizers, an entree and a dessert. Each. And that did not make it any easier to decide what to get. Even with four appetizers between us, there were three or four more we wish we could have tried. Because of the quantity of dishes, I was sort of expecting tiny composed portions, but the plates were extremely generous. With the appetizers alone, we would have left there happy campers. I'm glad we stuck around for the rest, though!


For our first appetizer course, we chose El Chinito Cubano, Papas Rellenas, and delicious tostones (which I sneakily ordered off the menu in addition to our other selections - score!). El Chinito Cubano was a set of spring rolls with a Cuban sandwich filling served with hot Chinese mustard. While I was extremely excited about this idea, I'd have to say it was my least favorite dish of the meal. Putting anything into a spring roll is a good idea, but the Cuban is not my favorite sandwich. Still, it was interesting, and the mustard was killer. Better were the Papas Rellenas, described on the menu as "Cuban potato croquettes filled with beef picadillo. Sweet and spicy guajillo pepper sauce. Crispy onions and Manchego crema." It reminded me of the Sicilian arancini - a deep-fried ball made of starch with tasty filling. Because of the deep red color of the sauce, I expected something spicy, but it wasn't - it was deep and rich and savory. The tiny sweet peppers in with the beef were excellent. When we go back, I'm totally ordering those again. Finally, the tostones were awesome. They came with a garlic dipping sauce that could kill a vampire at two hundred paces - a little strong on its own, but a nice complement to the plantains.


Then they brought us more food. Jeff's Mejillones Mar y Terra ("Prince Edward Island mussels, poached in rich lobster broth, roasted garlic, Berkshire pork belly, caramelized onions, steamed kale and slow roasted tomatoes") looked like an entree-sized portion. Yeah, you could point out (as I did) that the shells took up a lot of space, but even after they were removed it was a big dish. The contrasting textures of the mussels and pork belly was lovely and roasted garlic is always awesome. I was very happy with my empanada as well - I chose the chicken, corn, sweet pepper and Jack cheese option. It was beautifully crispy, served in a cute little fryer basket. It came with some baby spinach with an extremely (almost inedibly) salty goat cheese dressing and the best tomatillo relish I've ever tasted. It was sweet and rich and just a tiny bit spicy - a perfect complement to the crispy, creamy empanada. And also pretty great licked off of your fingers (since, you know, actually licking your plate in a restaurant is frowned upon).


Then they brought us more food. I was torn between a number of menu selections, yet again, but at the last minute fixed on the Lechón Asado. Best decision I've ever made. This was pork slow-roasted over a charcoal flame served over mashed yucca in a black bean broth, with a little slaw on top. The pork was amazing. Seriously amazing. It was juicy and smokey and charcoaly. Any pretensions I had to taking half of my entree home for the next day's lunch went out the window as soon as I tasted it.


Jeff got the Ajiaco de Pescado a mi Manera - salmon, chicken breast and scallops in a shrimp broth with bacon, yucca, calabaza squash, fennel, and cashew. All of these elements were brought together by the broth with provided the dish with a cohesive flavor. I only stole a small taste of chicken (since I'm not a fan of seafood), but I though that the broth had a lovely light sweetness to it. Jeff enjoyed the dish, but it wasn't as much of a standout as his appetizers (especially the mussels).


Finally, dessert. I had the tres leches - a vanilla sponge cake drenched in dulce de leche-flavored milk with a dab of caramel and a mocha mousse on top. The drenched cake just dissolves in your mouth into sweet creamy goodness. I'm not normally a fan of coffee, but the mocha mousse was perfect, with just a touch of coffee flavor. Jeff ordered the Pudín Diplomatico - banana bread pudding with chocolate chips, spiced rum and roasted pineapple. While I loved my cool and creamy tres leches, Jeff's pudín was more appropriate for the frigid evening with its warm and toasty banana and cinnamon over a sticky caramel sauce.  The dessert portions were sized well - not so small to leave you wanting more, but not enough to make you feel stuffed.

We were happy campers when we left Cuba Libre. My overall impression is very positive - we will definitely be back again for their delicious and unique (maybe not in Cuba, but definitely around here) offerings. A neighbor had commented that she found their food salty; that may have been true (I found myself very thirsty on the ride home), but I didn't notice it at the time (except with the salad dressing). Everything else exceeded our expectations. Restaurant week goes on through February 1st, so if you're looking for delicious food and a great value, I'd recommend a trip to Cuba Libre. I'm trying to find an excuse to go back next week!

Monday, January 21, 2013

Roasted Brussels Sprouts with Parmesan


Winter is all about comfort food, isn't it? Since Jeff had today off, we made a great, but labor-intensive, comfort food recipe: stuffed shells. After spending two hours making the sauce and the fillings, cooking the pasta and filling three or four dozen shells, we weren't really interested in a complicated side dish. These Brussels sprouts fit the bill perfectly: just toss the ingredients together and slide them into the oven. We started prepping the sprouts just as the shells went in the oven and both dishes came out within minutes of each other. Perfect timing.

I've made Brussels sprouts many different ways, but this is definitely my favorite. The sprouts still look and feel a bit firm when they're done, but once you bite into them, the soft interiors are revealed. The innermost leaves seem to steam themselves while the outer leaves caramelize in the pan. The garlicky, lemony, cheesy coating is the icing on the cake. I do enjoy stuffed shells (I'm the one who put them on the menu!), but I think that these Brussels sprouts were really the best part of the meal. I should start keeping some on hand so I can throw this dish together more often!

Roasted Brussels Sprouts with Parmesan
Slightly adapted from Simply Recipes.

 1 lb Brussels sprouts, stems trimmed
3-4 cloves garlic, minced
juice from half a lemon
2 tbsp olive oil
salt and pepper to taste
1/4 c grated Parmesan

Preheat oven to 350° F.

In a medium bowl, toss the Brussels sprouts with the garlic, lemon juice, olive oil, salt and pepper.


Transfer them to a cast iron skillet. Roast in the top rack of the oven for 30 minutes, stirring once or twice.


Remove and sprinkle with Parmesan cheese. Return to the oven for about 5 more minutes, until the cheese is browned but not burnt, then serve.

Tuesday, January 8, 2013

Pierogi


This Christmas, I was inspired to tackle my grandmother's pierogi recipe. When I was growing up, Grandma made pierogi (just like her mother before her) for nearly every family holiday. Unfortunately, as a kid, I didn't like them. I only started to appreciate them when I was around twelve years old - shortly before Grandma stopped making them. She had developed a back problem and kneading and rolling dough became difficult - I filled in as her dough maker for other baking projects, but pierogi just fell off the agenda. We began buying them from my great aunt's church, where an assembly line of elderly Eastern European ladies churned them out for every holiday. When we were unable to get those any more, we bought frozen ones from the grocery store, handmade by a local company. Grandma said that all of these substitutes were just as good as hers and it wasn't worth the trouble of making them herself. I disagreed. I remember how light and soft and delicate her dough was. Few of the pierogi substitutes we found, with their thick, heavy doughs, could really compare.

I had asked Grandma several times to teach me how to make them (since most of her "recipes" are of the oral, learn-by-doing sort), but she maintained that it wasn't worth the effort. This past Thanksgiving, though, I managed to run the end-around on her - I was expressing my frustration at this state of affairs to my mother when she remembered having a written version of the recipe on hand. We found the recipe card and I took it home, giddy with the excitement of making my family's favorite holiday treat the way it ought to be made.

Of course, this was easier said than done. I felt that I had enough cooking experience under my belt that I could handle this on my own. I was wrong. My first attempt yielded a tough, rigid dough. I actually had bruises on my hands from pressing so hard with the rolling pin. With great effort, I rolled out my dough, cut out circles and passed them over to Jeff to fill. Every time I rerolled the scraps, the dough became stiffer. Still, I was encouraged by the adorable little semicircles of goodness appearing on the baking tray beside me as Jeff filled and pinched them. They looked right - of course they would be delicious!

That thought lasted until we tried some for dinner. They were tough, dry and unappetizing. I gave in and called Grandma, who gave me a few key tips (after repeatedly insisting that this is something that can't be learned from a written recipe). She said the dough should not be difficult to work with (at that point, I had an inkling that I hadn't added enough water). When I happened to ask about how she cut them out (I was having trouble finding a suitable cutter), she dropped the biggest tip of all: hers were not cut. She made the dough into small balls and then rolled each one individually. No need for rerolling scraps, nothing goes to waste. She told me that her mother had used this method back when Grandma was young. My great grandmother was clearly a brilliant woman.

The second attempt went swimmingly. Following Grandma's tips and my own instinct about what went wrong the first time, this batch of pierogi were absolutely perfect. As soon as the first three or four were filled, I had Jeff cook them to test out the dough (if they came out badly, I was prepared to toss the dough and begin again, without wasting any of our filling). When they came out, I could tell by looking at them that they were right. When I tasted mine, I jumped for joy. Jeff had to endure several minutes of me walking around the house, fists in the air, celebrating my victory. I spent a lot of time grinning as we finished the rest of the batch.

Three good things came out of this experience. The first is that I've learned how to make awesome pierogi on my own (ok, the dough was on my own - Jeff helped with the rest). The second is that Grandma has finally offered to give me a tutorial. She wants me to come by some time and make them while she watches and can give me tips - which is exactly what I'd been wanting for years. I guess I just had to demonstrate my determination in order to get it. Finally, my pierogi-making earned me a family heirloom. After hearing how much trouble I had rolling out my dough (even though most of this trouble came from making the dough improperly), Grandma decided to give me her rolling pin. Her rolling pin, picked up at a flea market sixty years ago, is a solid piece of heavy wood. I have never used one that could compare (especially not the flimsy, handles-falling-off model I currently use - see the picture below for a comparison). I knew I would inherit this someday, but it was even better to have her give it to me voluntarily (I'm sure I could have wheedled it out of her, but that's not the same) while she can still enjoy the things I make with it.


Pierogi Dough
My great-grandmother's recipe.

2 c flour
1-2 eggs (the written recipe I got from my mom says 2 eggs, so that's what I used, but Christmas dinner, when Grandma was quizzing me on how I made these, she insisted that she'd always used just 1 egg. I plan on trying it that way next time.)
1/2 tsp salt
1/3 c water (I only got about 1/4 c of water into the dough - possibly because I was using an extra egg)

Mound the flour on your work surface and make a well in the center (like you're making pasta). Add the salt and egg to the well. Carefully begin to mix the flour with the egg, keeping the flour mounded so it doesn't run out the sides. Add the water as you knead (in trying to add enough water during my second attempt, I made the dough into a slimy mess. I just floured my hands to keep them from sticking and continued to knead. After a few minutes, the liquid incorporated itself and the dough was perfect. If it looks bad, just press on and see what happens before making any changes.) Continue to knead until well mixed. Let the dough rest for 10 minutes under a damp tea towel.


Break off a small ball of dough to roll out and cover the rest with the damp towel.


Roll the ball into a rough circle, between 1/8" and 1/16" thick (mine were thin enough that I could just see the pattern in the marble through them. If they're too thin, they will break when cooked, so don't go any thinner than that). Repeat with the rest of the dough. (If you're going solo, fill each dough circle immediately, before it dries out. It's much better to have an assistant or two who can handle the filling.)


Fill each circle with about 1 tbsp of filling (of course, this amount could change depending on the size of the circles you rolled). Fold the dough over the filling and pinch the edges closed with your fingers (we like to pinch ours two or three times - if they're not fully closed, they will break as they're cooked). Set aside.

At this point, they can be frozen. We just set them right onto baking trays and froze them raw, removing them later to ziplock bags. While this worked well, Grandma insists that they ought to have been parcooked beforehand. If you'd prefer this method, boil them for 2-3 minutes before drying well and freezing on trays.

To cook, place pierogi in a rapidly boiling pot of salted water. Cook until they rise to the top and the dough is sort of ripply. They can be eaten as-is, or dried off and subsequently fried in butter. One recipe made about 40 for us - the number will depend on the size of the little balls you roll.

Fillings: Pierogi can be filled with anything you'd like (I've seen some combinations in Polish shops that looked pretty strange to me - I'm mystified by blueberry pierogi). In my house, we always stuck with two of the most traditional: potato and sauerkraut. The potato filling is really just mashed potato. To prepare for our pierogi-making, Jeff made a big pot of mashed potatoes with some goat cheese and dill. Then we fried some onions in butter and mixed them with the potato. Measurements don't need to be exact here - just make it taste good. If there are leftovers, eat them. For the sauerkraut, we fried some onions in butter and added 1-2 cups of drained sauerkraut (you don't want it soggy) to the pan until heated and combined. Grandma tells me that you can do the same thing with raw cabbage, if you'd prefer.

Sunday, December 23, 2012

Classic Pizzelles


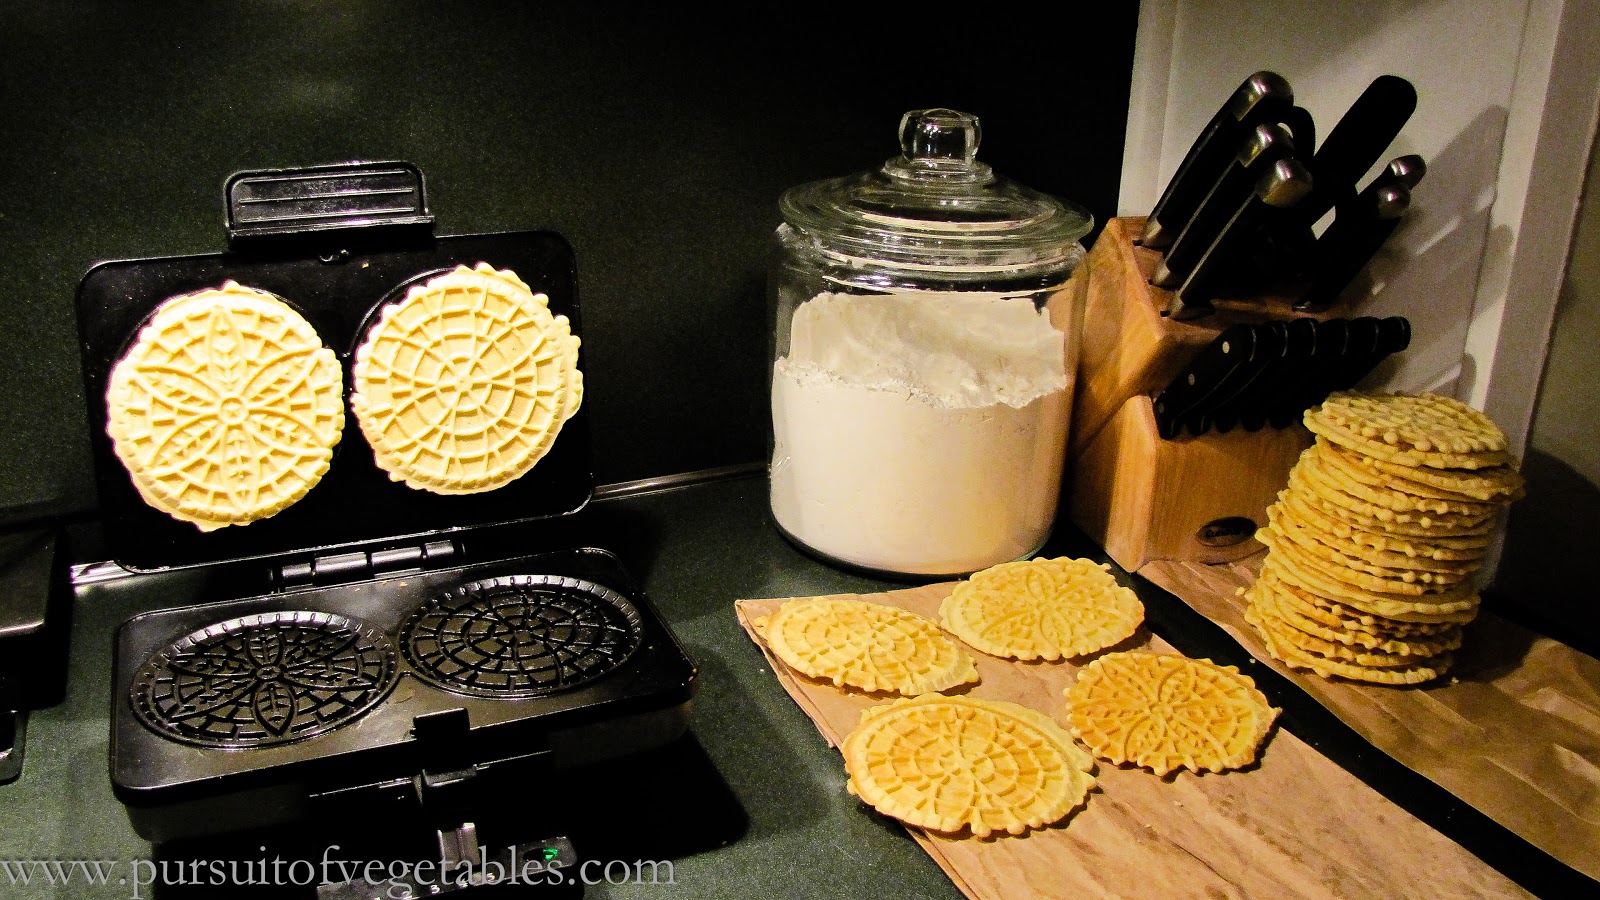
It's not Christmas without some pizzelles! I shared my chocolate pizzelle recipe with you a few years ago. This year, I thought it was time to share the real deal. I've made several pizzelle flavors over the years - vanilla, chocolate, chocolate hazelnut, pumpkin - but vanilla is always my favorite.

My mom has always limited pizzelle-making to the holidays because it can be a time-consuming process. Most presses only make two cookies at a time - the number that I used to eat as a kid would keep my mom busy for hours. I don't mind taking the time as much, since they're my favorite cookies, but I've still been saving them for special occasions. But now that we have a TV in our kitchen (merry Christmas to us!), pizzelle-making is no longer a chore. I can sit in the kitchen, monitoring the press and watching a good movie. It was seriously easy. I may be making these far more often in the future - especially since they store so well!

Classic Pizzelles

1 3/4 c flour
2 tsp baking powder
3 eggs
3/4 c sugar
1/2 c butter, melted and cooled
1 tbsp vanilla

First, set up your work station. You'll need an electric mixer for the batter, a hot pizzelle press, and a paper bag or some paper towels for the pizzelles to cool on. (Why not a cooling rack? This is the way my mom always did it. But I think the paper bags help draw the moisture out of the cookies as they finish cooking, creating a crispier result.)

Whisk together the flour and baking powder in a small bowl. Combine the eggs and sugar in the mixer bowl. Mix on medium speed for about a minute. Add the butter in a slow stream, then repeat for the vanilla. Add the dry ingredients and mix for another 20 seconds or so, until everything is moistened. The batter will be thick.


Drop the batter onto the pizzelle press in teaspoon-sized portions (my press came with a special little plastic spoon for this). Make sure you center each dollop on the pattern (I also find that positioning it slightly to the back of the press works well, since the batter is squeezed forward as the press closes). Close the press and cook 1-2 minutes until slightly golden, or until the press tells you they're done (mine has a convenient green light that goes off).


When the cookies are ready, gently peel them off (it shouldn't be too difficult - the vanilla ones are the easiest to work with of any pizzelles I've made) and place them on the paper bag or towel to harden (I stack them when they're cool to conserve space). Repeat with the rest of the batter (you'll probably want to find a good TV show to watch). These can be stored in a box or tin for several weeks - avoid air-tight containers, which might make them soggy.


Friday, December 21, 2012

Fudge-Dipped Cherry Shortbread Sandwich Cookies


I've been wanting to make these cookies for years. They've made it on my Christmas to-do list before, but somehow they never happen. I guess I thought they would be really time-consuming, what with the shortbread, the filling and the fudge dipping sauce. As it turns out, however, there is not much hands-on time at all. The recipe is extremely easy to throw together in little stages. The shortbread is tasty, the cream is awesome, and the fudge sauce is luscious.

The one problem I have with this cookie is the fudge sauce. It tastes delicious, but it's not very practical. It remains soft and drippy even after a night in the freezer. I placed some cookies on a plate for a few minutes in order to take the above picture, and they'd already left chocolate smears all over it. In the future, I think I'll dispense with the fudge sauce (who wants to eat corn syrup anyway?) and go for a hard chocolate coating, like what you would use on a truffle. I'm still including the fudge recipe here, but I'll update it when I come up with a better solution.

Fudge-Dipped Cherry Shortbread Sandwich Cookies
From Better Homes and Gardens November 2009.

Shortbread:
1/2 c dried cherries
1 1/2 c flour
1/2 c sugar
2 tbsp cornstarch
1/2 tsp salt
1/4 tsp baking powder
3/4 c butter, cold and cut into 1/2" pieces

Fudge:
1/2 c heavy cream
3 tbsp light corn syrup (I did find an organic, GMO-free one!)
4 oz semisweet chocolate chips

Cream:
1/2 c heavy cream
3 oz cream cheese, softened
1/4 c powdered sugar
1/2 tsp vanilla extract

Preheat oven to 325° F. Add the cherries to a small bowl and cover with boiling water. Let sit ten minutes, then drain.

In a food processor, combine flour, sugar, cornstarch, salt and baking powder. Pulse until combined. Add the butter and soaked cherries and pulse until the dough begins to clump together. Dump out onto a sheet of parchment paper. Mold the dough into a square, cover with another sheet of parchment paper, and roll into a 12 x 9" rectangle (I don't know how you roll things into rectangles - mine was more oval, so I sliced the edges off and rolled them out separately. That's what caused the different-sized rectangles in the picture below). Remove the top parchment and use a knife to slice the dough into 3 x 1" pieces (but don't separate them!). Slide the parchment onto a baking sheet.


Bake the shortbread for 30-35 minutes, until lightly golden. Remove and cool completely on a wire rack. Then use a knife to separate the rectangles and match them into evenly-sized pairs.

Meanwhile, make the fudge sauce. In a small saucepan, combine the cream and corn syrup. Cook over medium-high heat until hot. Remove from heat and add the chocolate chips, stirring with a spatula until the chocolate is melted and combined. Let cool for about an hour, until thickened.


To make the cream filling, combine the cream, cream cheese, sugar and vanilla in a medium bowl. Beat with an electric mixer until stiff peaks form. Refrigerate until ready to use.

When everything is ready, assemble the cookies. Pick up a pair of shortbreads. Use a small spatula to spread the cream onto the flat side of one cookie. Top with the other cookie, flat side down. Dip one end into fudge sauce, then place on a piece of parchment paper to dry (since I was making these a week or so in advance, I put the parchment on a baking sheet which I could slip in the freezer. Once frozen, I removed them to tupperware containers). Repeat with the rest of the cookies.


Wednesday, December 19, 2012

Cranberry-Pecan Oatmeal Cookies


It's cookie-making time! I started the week with an intimidating list of Christmas cooking and baking projects. So far, though, everything is going swimmingly. Most of my cookie baking is complete, both for desserts and edible gifts, and what's left is definitely do-able in the time I have available.

I look forward to holidays and family gatherings as a time to bake some of the new, fun recipes that I've been stockpiling. However, this seems to please me more than everybody else. When it comes to gifting, I fall back on the old standards that my family always asks for. These oatmeal cookies are one of my specialties. This batch is for my Grandma - she insists that I shouldn't buy her any presents and that she doesn't need anything, but these cookies always bring a smile to her face.

These cookies are just as good for gifting as they are for munching on a weekday afternoon. It's a great all-purpose recipe to have around. I think Santa would appreciate it if you left some out for him, too!

Cranberry-Pecan Oatmeal Cookies
Adapted from Southern Living Best of Barbecue cookbook.

1 c butter, softened
1 c sugar
1 c brown sugar
2 eggs
1 tbsp vanilla extract
2 c flour
1 tsp baking soda
1/2 tsp baking powder
1/2 tsp salt
1 1/2 c rolled oats
1 c dried cranberries
1 c chopped pecans

Preheat oven to 375° F. 

In a stand mixer, beat the butter until creamy, then add the sugars. 


Add the eggs and vanilla and mix until combined. In a separate bowl, whisk together the flour, baking soda, baking powder and salt. Gradually add this to the butter mixture until everything is well moistened. Stir in oats, raisins and pecans. Drop in teaspoon-sized pieces (mine are probably a bit larger) onto greased baking sheets. Bake 8-10 minutes, until lightly browned.


Cool on a wire rack. These can also be frozen if you want to make them ahead of time.