Showing posts with label Italian. Show all posts

Sunday, December 23, 2012

Classic Pizzelles


It's not Christmas without some pizzelles! I shared my chocolate pizzelle recipe with you a few years ago. This year, I thought it was time to share the real deal. I've made several pizzelle flavors over the years - vanilla, chocolate, chocolate hazelnut, pumpkin - but vanilla is always my favorite.

My mom has always limited pizzelle-making to the holidays because it can be a time-consuming process. Most presses only make two cookies at a time - the number that I used to eat as a kid would keep my mom busy for hours. I don't mind taking the time as much, since they're my favorite cookies, but I've still been saving them for special occasions. But now that we have a TV in our kitchen (merry Christmas to us!), pizzelle-making is no longer a chore. I can sit in the kitchen, monitoring the press and watching a good movie. It was seriously easy. I may be making these far more often in the future - especially since they store so well!

Classic Pizzelles

1 3/4 c flour
2 tsp baking powder
3 eggs
3/4 c sugar
1/2 c butter, melted and cooled
1 tbsp vanilla

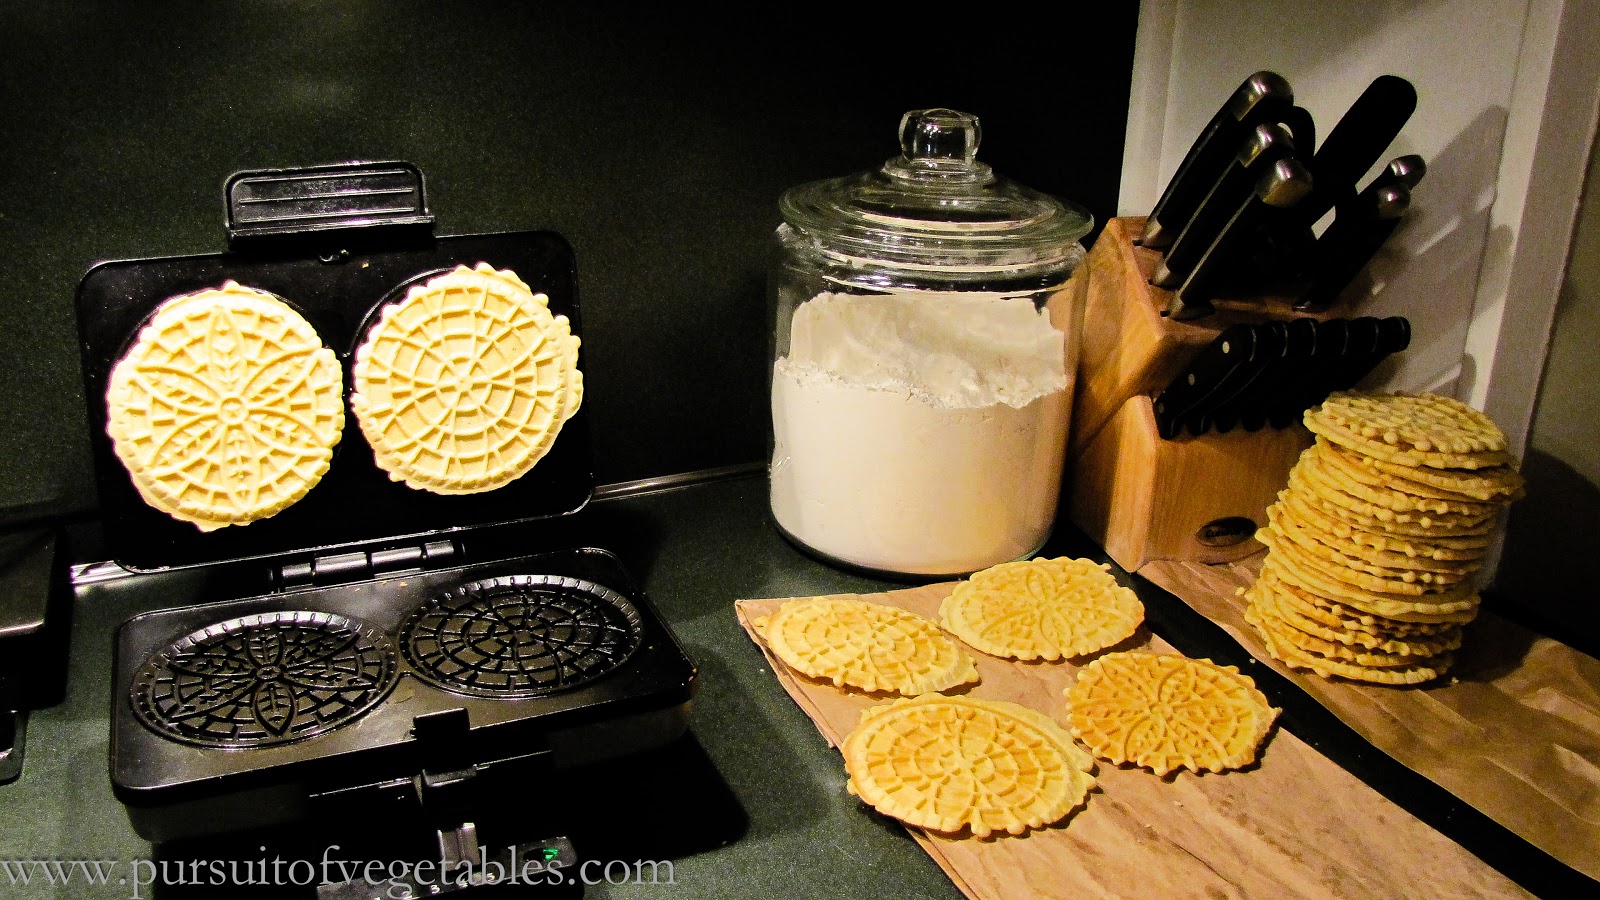
First, set up your work station. You'll need an electric mixer for the batter, a hot pizzelle press, and a paper bag or some paper towels for the pizzelles to cool on. (Why not a cooling rack? This is the way my mom always did it. But I think the paper bags help draw the moisture out of the cookies as they finish cooking, creating a crispier result.)

Whisk together the flour and baking powder in a small bowl. Combine the eggs and sugar in the mixer bowl. Mix on medium speed for about a minute. Add the butter in a slow stream, then repeat for the vanilla. Add the dry ingredients and mix for another 20 seconds or so, until everything is moistened. The batter will be thick.


Drop the batter onto the pizzelle press in teaspoon-sized portions (my press came with a special little plastic spoon for this). Make sure you center each dollop on the pattern (I also find that positioning it slightly to the back of the press works well, since the batter is squeezed forward as the press closes). Close the press and cook 1-2 minutes until slightly golden, or until the press tells you they're done (mine has a convenient green light that goes off).


When the cookies are ready, gently peel them off (it shouldn't be too difficult - the vanilla ones are the easiest to work with of any pizzelles I've made) and place them on the paper bag or towel to harden (I stack them when they're cool to conserve space). Repeat with the rest of the batter (you'll probably want to find a good TV show to watch). These can be stored in a box or tin for several weeks - avoid air-tight containers, which might make them soggy.

Friday, August 10, 2012

Farm Fridays: Tortellini Pesto Salad


I am back in the country and it is Farm Friday! After spending several weeks in pursuit of vegetables on foreign shores, I have found the mother lode in Pennington. My CSA share today was epic. Behold the glory: 


Blackberries, watermelon, summer squash, tomatoes, green beans, jalapenos, potatoes, chard, basil, parsley, shallots, bell peppers and eggplant, along with a lovely large bouquet of flowers. There was so much going on that it was difficult for me to decide on a menu for the week. Normally, I give top priority in my planning to things that are very perishable and any leftovers from the previous week. Today, overwhelmed with options (and feeling the jet lag), I was a bit more haphazard. Hopefully we will get through a good portion of this pile without it spoiling! I may have to make a ton of pesto this weekend to use up my half pound of basil.

Pesto was on the menu for today, but instead of making some fresh, I felt obliged to try and use up the last of my frozen pesto from last summer. Last July, to be precise. It's quite a bit past its peak (which was technically in December), but it tastes fine and I can't countenance wasting it. So fresh pesto will have to wait another day or two. Until then, old pesto or not, I will be enjoying this delicious tortellini salad, packed with summer vegetables. If it pleases you, feel free to make yours with fresher stuff.

Since I'm finally back home, expect to see more recipes on the site soon!  

Tortellini Pesto Salad
Adapted from a recipe found in the Wegman's circular a few summers ago.

1 package cheese tortellini (I used tricolor because it looks pretty)
1 bell pepper, thinly sliced (red might be nice, but green's what's available)
1 large shallot, thinly sliced
1 small bunch asparagus, cut into 2" pieces (I know what you're thinking - asparagus is not in season. But, if you remember, I froze some back when it was, to have it available for recipes just like this! Feel free to leave it out if there isn't any available locally.)
2 tbsp olive oil
1 zucchini, sliced into half moons or quarters
3 tbsp pine nuts
1 cup cherry tomatoes, sliced in half
3-4 oz basil pesto
15 basil leaves, thinly sliced

Preheat oven to 450°F.

Cook the tortellini according to package directions. Drain and rinse with cold water. Set aside.

Season the pepper, shallot, asparagus and zucchini with salt and pepper, then drizzle with olive oil. Transfer to a foil-lined baking sheet and arrange in a single layer. Roast for 10-12 minutes, stirring halfway through, until the vegetables are cooked through and soft, though not yet browned. Remove and set aside.

Meanwhile, toast pine nuts in a small pan on the stove top for 2-3 minutes, shaking frequently, until they begin to brown. Remove from pan and set aside.

In a large bowl, combine tortellini, vegetables, pine nuts, pesto and sliced tomatoes. Gently stir to distribute the pesto. Season with salt and pepper, if needed. Serve room temperature or chilled, as either a main course or a side dish.

Tuesday, February 28, 2012

Oregano Focaccia with Tomato and Caramelized Onions


When Jeff picked out this focaccia recipe to make this week, I was only mildly enthusiastic. I usually prefer thin crust pizzas (and this is essentially a pizza - same dough, different cooking method). I also wasn't convinced that the dough would cook properly this way. I envisioned a crisp, overcooked crust and a soggy top with limp veggies. I did not get any of that.

The crust was perfectly done, slightly crispy around the edges but tender and firm. The tomatoes dehydrated slightly, packing a huge flavor punch. Add to that the gorgeous caramelized sweet onions - how they managed to stay moist without making the crust soggy is beyond me, but I'm glad it worked! The sprinkling of salsa jack cheese added a nice pizza-y touch. Super yummy.

I kicked the original recipe up a notch or two by making my own pizza dough. Replacing half the flour with whole wheat added some healthy fiber, and a pile of dried oregano in the dough pumped up the flavor. Oregano is the bomb. What made it even better was that it was dried Greek oregano from my own garden. I can't wait to try this again with my own tomatoes! And maybe some fresh basil? I'm looking forward to summer already!

Oregano Focaccia with Tomato and Caramelized Onions
Adapted from For the Love of Cooking.

1 c whole wheat flour
1 c bread flour
2 tbsp dried oregano
1/2 tsp salt
1/2 tsp sugar (I used my unrefined sugar again - because it is a powder rather than crystals, I think it works really nicely in dough)
1/4 oz instant yeast (1 package)
3/4 c water(115-120°F)
3 tbsp olive oil, divided
1/2 red onion
1 sweet yellow onion
2 plum tomatoes
1/2 c shredded cheese (I used salsa jack, but Asiago or mozzarella would work well too)
salt and pepper to taste

Combine the flours, oregano, salt, sugar and yeast in a large bowl. Add the water and 1 tbsp olive oil and stir until the dough comes together. Turn out on a lightly floured counter and knead for about 7-9 minutes, until smooth and elastic.


Place the dough in an oiled bowl, cover with a damp kitchen towel and let rise in a warm place for about an hour.

Meanwhile, slice the onions thickly and the tomatoes thinly. Shred the cheese, if it isn't already. Preheat oven to 400°F. Coat a 8 x 12" glass baking dish with baking spray.


In a large skilled, heat 1 1/2 tbsp of olive oil over medium heat. Add the onions and slowly cook until caramelized, about 20 minutes. Season with salt and pepper to taste.


Take the risen dough and gently spread it into a rectangle the size of the baking dish. Press it gently down into the dish. Drizzle 1/2 tbsp of olive oil over the dough. Spread the caramelized onions over the top. Sprinkle cheese over onions and place slices of tomatoes on top. Salt and pepper to taste. 


Bake until the bread is puffy and golden around the edges. Serve while still warm!

Tuesday, October 11, 2011

Tuscan Lemon Muffins


I made these muffins last week. I still don't know how I feel about them.

I was looking for a recipe that would use up some leftover ricotta cheese and lemons. I was also looking for breakfast. This seemed to fit the bill.

Muffins are always quick, and these were no exception. It's a very easy recipe to whip up and toss into the oven. So far, it doesn't sound so bad . . .

The problem is the flavor. They are lemony, yes. But they're also cheesy. I don't normally think of ricotta as a cheesy cheese, but there was clearly something cheesy about these muffins. Weird, right? Ricotta does give baked goods a bit of a spongy texture, so I expected that. But I didn't expect the the cheesiness. Perhaps it was the brand of ricotta I used (Organic Valley). Perhaps it was the strength of my lemon. I'm not sure.

Would I do this recipe again? I'm still on the fence. I haven't written it on a recipe card, which suggests that I don't plan on keeping it. Then again, I haven't gotten rid of the magazine page yet. It's an average muffin. Low calorie and good for breakfast, uses up annoying leftover ingredients, but not something I'll be craving in the middle of the night.

October roses in the backyard.

Tuscan Lemon Muffins
From Cooking Light May 2011.

1 3/4 c flour
3/4 c sugar
2 1/2 tsp baking powder
1/4 tsp salt
3/4 c ricotta cheese
1/2 c water
1/4 c olive oil
zest from one lemon
juice from one lemon
1 egg, lightly beaten
2 tbsp demerera sugar

Preheat oven to 375° F.

Whisk together flour, sugar, baking powder, and salt in a large bowl. In another bowl, combine ricotta, water, olive oil, lemon zest, lemon juice, and egg. Add the wet mixture to the dry and stir until just moist.


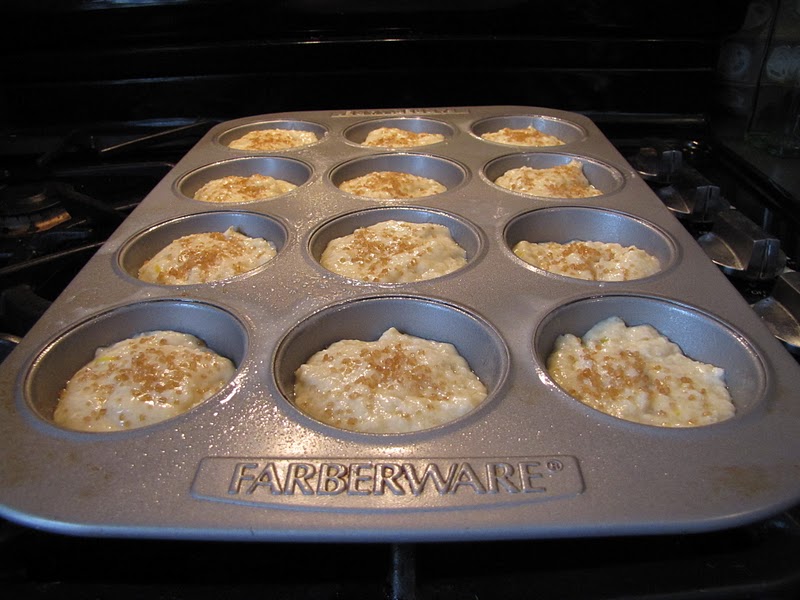
Lightly coat a muffin pan with baking spray. Divide the batter among the cups (I got a dozen muffins). Sprinkle demerera sugar on top of each muffin. Bake for 15-18 minutes, until a toothpick comes out clean.


Cool in the pan 5 minutes, then remove and serve or store. (I found that these freeze well.)


Tuesday, August 30, 2011

Rustic Tomato Sauce


After much prodding by certain friends, I have finally gotten around to posting a tomato sauce recipe. Whenever I make sauce, I follow the same general plan. The differences tend to be what happens with the tomatoes (canned or fresh, peeled or not, finely chopped or chunky) and any add-ins (roasted red pepper, balsamic vinegar). Lately, I have been favoring a more rustic style of sauce.

"Rustic," in this sense, is another word for "lazy." This is a sauce you can make quickly, any day, with whatever produce you have lying around (of course, some of that produce needs to be tomatoes). I primarily used cherry and grape tomatoes (including the sweet 100s from our yard), but I also had some larger plums that were going soft, so they got thrown in as well. The tiny onions were also from our garden (those are normal yellow onions . . . they didn't do as well as I'd hoped), as are the banana pepper and herbs. The herbs for this batch include basil, parsley, thyme and oregano, but I've used others as well. What I'm saying is, this recipe is a tasty way to get rid of the spare produce you have lying around. Quantities aren't very important. Chopping is done roughly. Tomatoes are not peeled. The immersion blender is unnecessary. This sauce is delicious on top of chunky pasta, or even green beans, which is how we served this batch.

This is the time of year we should all be up to our ears in fresh tomatoes and peppers. Enjoy them while you can! Throw together a batch of tasty sauce and revel in the flavors of late summer!

Rustic Tomato Sauce

2-3 tsp olive oil
1/2 c onion, chopped (you can rough chop them by hand or throw them in the food processor for a finer chop, like we did here)
1-2 cloves garlic, minced
peppers, hot or sweet (in this case, we used both a sweet banana pepper and a hot Thai chile)
2-3 cups various tomatoes
assorted herbs, chopped roughly


Heat a medium skillet over medium heat. Add the oil and swirl to coat (you can see from the picture below that we used very little oil for this batch - it's really only necessary for cooking the onions and garlic). Add the onions, garlic and peppers to the pan and saute 4-5 minutes, until soft.


Meanwhile, chop the tomatoes. Tiny tomatoes need only be halved, but larger ones may need to be cored and diced (I quartered some of the larger cherry tomatoes. Just keep everything roughly the same size). Add them to the pan.


Simmer the tomatoes for 10-15 minutes, stirring occasionally (covering the pan helps to speed up the process, if you need to), until they reach a sauce-like consistency.


Toss in the chopped herbs and cook another 1-2 minutes. Serve over pasta, green beans, or whatever else you'd like!

Tuesday, August 23, 2011

Grilled Pattypan Squash Skewers


Grilled vegetables are awesome. I love the grill marks. I love the little bits of char they get on the edges. I love the slightly shriveled, dehydrated look of them, because I know it promises super-concentrated flavor.

I'm sure I've mentioned that I never liked summer squash - I've only begun to eat it this summer, and primarily via the grill. Well, this is becoming my favorite kind of squash to grill. I'd never eaten pattypan squash before. To be honest, I'd thought it was a winter squash variety when I'd seen it at the farmers market. But when it appeared in a bin with the zucchini at my CSA, I figured things out. I love winter squash, but summer squash is super-easy - no thick skin to peel, no stringy, seedy pulp to extract. I just sliced these babies into eights and stuck them on skewers.

The original way I prepared these was an Indian-spiced version from Cooking Light. I had actually meant to do that last night as well, but I had no fresh ginger. The ginger and other spices (whole coriander, ground cumin, etc) really give the squash some zip. Lacking the ginger, I decided to try a more Italian preparation (to go with our ravioli), coating the squash in fresh herbs, which allowed the flavor of the squash to shine on its own. The addition of some red onion adds a lovely pop of color and flavor to the skewer. A feast for the eyes as well as the palate!

Grilled Pattypan Squash Skewers

2 pattypan squash, cut into eighths
2 red onions, cut into eighths (I use the biggest pieces and reserve the small ones for other recipes)
1/4 tsp dried parsley
1/4 tsp dried basil
1/4 tsp dried thyme
1/8 tsp dried rosemary (you could certainly use fresh herbs instead)
salt and pepper
2 tsp olive oil


Combine the chopped vegetables in a bowl with the herbs, salt and pepper and oil. Toss to coat.


Thread the vegetables onto skewers (I try to alternate colors for greater visual impact).


Arrange the skewers on a preheated grill. Cook 12-15 minutes, rotating once or twice as necessary.

Saturday, March 5, 2011

Broccoli and Pesto Tagliatelle


We had the most delicious (and fast!) dinner on Thursday: lemony chicken saltimbocca with broccoli and pesto tagliatelle. That chicken recipe will certainly turn up here some day. Today we're going to focus on the side dish.

This pasta recipe comes from my newest cookbook, Jamie's Food Revolution. I got it for Christmas, marked a slew of recipes that I wanted to make, and ignored it until last week. Now I've made two recipes from it: braised bacon cabbage (which I'll be redoing this coming Tuesday and hopefully posting) and this. The cabbage was very quick, quite simply, and incredibly tasty. Oh, and the whole house smelled like garlic and pancetta (I didn't have any bacon). This dish was equally quick, light and yet very satisfying. Since Jamie Oliver is clearly a brilliant man, I have to wonder why I left this book sitting for so long. Perhaps it's the pictures. While there are plenty of them, they are a bit . . . messy-looking? out of focus? I'm not sure. Whatever it is, though, I am sure that it was on purpose. This book is intended to teach cooking to people who really don't know how, so I think the pictures are meant to make everything feel real, like something the average person could do at home.

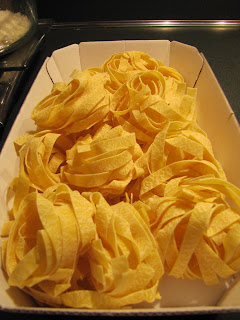
The simplicity of this recipe made it enjoyable to cook, despite my being sick and miserable at the time. Everything goes into one pot, drains, and then goes back in the pot to be tossed with the dressing. Very little mess. The hardest part was peeling the potato so thin - I don't have the right sort of peeler, so it was a bit of a chore. The most fun part was playing with the tagliatelle, which came in little nests. I'm not sure if it's the variety of pasta or the brand I bought, but it cooked incredibly quickly, too - just four minutes!


A few notes: I did not have any fresh basil so I just left it out. While this was definitely a solid pasta dish without it, I did feel like it was missing something. I think it would be killer with the basil. Next time I'll be sure to secure some. Also, I left out the broccoli stems. I love broccoli, but am not a fan of stems. However, I did feel like the recipe was a bit light on broccoli (this was particularly true of the leftovers, since I took a generous amount of broccoli the first night). Next time, I think I'll try including the stems to even out the proportions.

Broccoli and Pesto Tagliatelle
Adapted from Jamie's Food Revolution.

1 medium potato
1 head of broccoli
handful fresh basil
sea salt
1/2 lb dried tagliatelle
1/4 c green pesto
3 oz grated Parmesan

Bring a large pot of salted water to a boil.

Wash and peel the potato. Use the peeler to slice the potato into very thin shavings (as thin as you can manage - they need to cook quickly). Cut off the broccoli florets and set them aside. Cut off the base of the stem and discard. Halve the stem the long way, then slice thinly (not quite so thin as the potato- 1/4" would be fine).

When the water is boiling, add the tagliatelle and broccoli stem and cook according to the directions on the pasta package. 2 minutes before the pasta is finished, add the broccoli florets and potato shavings to the water. When done (check the potato to make sure it cooked through), drain into a colander and return the pot to the stove.


Roughly chop half the basil leaves and add them to the pot. Combine with pesto and half the Parmesan. Return the pasta mixture to the pan and toss to combine with dressing. Serve garnished with remaining Parmesan and basil.


Monday, February 21, 2011

Sausage, Spinach and Ricotta Stuffed Shells


Finally, a recipe good enough to share! I've been cooking consistently this month, but I've either neglected to photograph my recipes or decided they weren't worth it. Tossing shredded carrots and broccoli with store-bought dressing doesn't warrant a blog post (seriously, Bon Appetit?). 

This is a great recipe for this time of year, when you're still craving winter's comfort food, but are trying to shake off some of its heaviness. I found that the spinach took up a lot of space in the filling that might otherwise have been taken up by cheese and sausage. That made for a much lighter shell. I think it's also a good recipe for busy people. Making the shells did take me forever - around two hours - but the recipe makes four dozen, which will last quite a while. And the prep time was my own fault. I took my time and went the long way about prepping some of my ingredients. For example, I used fresh baby spinach where the recipe suggested frozen, which meant I had to spend a good 40 minutes stacking tiny leaves and chopping them up. Halfway through I realized that this is what food processors are for. But really, the rhythmic nature of chopping can be relaxing, so I pushed through to the end. The sausage took a long time, too, because mine refused to crumble. It was a little tricky to get it out of the casing, but then it just sat in the pan, foiling my efforts to break it up. I ended up taking it out of the pan and dicing it, which also took awhile. Next time I'll go for butcher-fresh sausage, rather than the packaged national brand for easier crumbling. 

But despite these hangups, I ended the day with a lovely tray of shells baking in the oven and two more in the freezer for later. I find that stuffed shells freeze very well. I make them in my glass pyrex oven dishes, pop the lid on and freeze the whole thing. They'll just need a few extra minutes in the oven later on. 

And the immediate payoff, apart from a tray of shells for dinner, is a house smelling like sauteed sausage and onions and an oven full of sweet, concentrated tomato sauce (I love what time in the oven does to tomato sauce!) rather than burnt popcorn. That's a definite win.

Sausage, Spinach and Ricotta Stuffed Shells
Adapted slightly from Simply Recipes.

12 oz package of jumbo shells
1 tbsp olive oil
1 large yellow onion, chopped
3/4 lb sweet Italian sausage, casings removed and chopped
2-3 large garlic cloves, minced
1 egg
16 oz ricotta cheese (I think I used 22 oz, because I was trying to get rid of some leftovers, so I ended up with a bit more filling)
10 oz fresh spinach, rinsed well and chopped
1 c grated Parmesan
1 tsp dried basil (or 1 tbsp fresh)
1/4 c plain bread crumbs
1/2 tsp salt
1/2 tsp pepper
2 jars tomato sauce

Bring a large pot of salted water to a boil. Cook the shells according to package directions. Drain, rinse in cold water, and set aside.

Heat olive oil in a large skillet over medium-high heat. Add the onions and cook about 5 minutes until softened. Add the sausage to the pan and cook about 5 more minutes (until no pink remains). Add the garlic and cook about 30 seconds, until fragrant. Remove from the heat.

In a very large bowl, beat the egg lightly. Then add the ricotta, 1/2 c Parmesan, basil, bread crumbs, salt and pepper. Mix this well, then add the spinach and the sausage mixture. (You could combine all this at once, but I found it easier to work with the cheese mixture first, and then add all the extras. I think that gave me a more even mixture.) 


Spread some sauce in your baking dish (I used about half a jar of sauce for a 9 x 13 dish - my other two baking dishes were smaller, so I adjusted accordingly. The idea is just to give your shells something moist to sit on). Fill each shell with about 1 tbsp of cheese mixture and arrange in the pan (it's hard to judge how much each shell needs. I think 1 tbsp is a good start, and if there's any filling left over, you can go back and add it to any shells that look skimpy). Spread the remaining sauce on top.
  

When you're ready to bake, preheat your oven to 375° F. Cover the pan with foil and bake about 30 minutes, until hot and bubbly (remember to add a few minutes for frozen shells). Remove foil, sprinkle with remaining 1/2 c Parmesan and bake uncovered for 10 more minutes. Let cool slightly before serving.


Like I said earlier in the post, this made about 4 dozen for me, even with some broken shells. If you aren't making this for a large group, just freeze the rest until you need them.

Monday, February 7, 2011

Lemon Ricotta Cookies


I threw the best dinner party yesterday.

Jeff and I love to cook for people. We keep making delicious food that we'd love to share with other people. Unfortunately, we live over an hour from any of our relatives and most of our friends. It takes a lot of planning to get anyone down here. So we don't throw parties as often as we'd like.

The last dinner party we threw was in December, for a group of close friends. We decided to make several of the most delicious recipes we had in our repertoire. Unfortunately, we planned things poorly. Our guests began to arrive just as I started the béchamel sauce for my roasted vegetable lasagna. I ended up being tied to the stove until dinner was ready, and Jeff had to be in the kitchen for most of that time, too. The food was delicious, we had fun, but we made it very stressful for ourselves at the beginning.

When I decided to throw a collective birthday party for my parents and my brother (all within two weeks of one another - my birthday's the odd one out in my family), I knew we had to do things differently. I decided to make an entree that would just sit on the stove for hours and be ready whenever I needed it: I settled on beef stew (after some negotiation with my brother, who is food-critic picky - he agreed with this on the condition that the meat wouldn't be tough). I did three side dishes, one of which was a casserole that we had prepared before the guests arrived and could pop in the oven whenever. I made biscuits the day before. My only duties once people arrived were two side dishes, one of which was just roasting in the oven, that took about 20 minutes. So I actually had time to go out and talk to people, which was lovely. I definitely plan on going this route again.

The other great thing was the food, which got rave reviews. I'm sorry that I'm not posting about the beef stew - I will someday - because that went over extremely well. First of all, it was a good entree for a crowd with different needs. There were multiple requests for bowls of stew with no meat in them. Meanwhile, my brother wanted extra meat but few potatoes. And he ended up having three servings and leaving us with a few tiny vegetables at the bottom of an empty pot. The side dishes went over equally well, since there's almost nothing left (and I tend to overcook). It's a wonderful feeling to know that you've worked hard to make something delicious and that everyone really enjoyed it.

But I digress, since I'm here to tell you about dessert. I really restrained myself here. Last year when I did this, I made a layer-cake (since it was a birthday party). But everyone on my family seems to be on some kind of diet and not want that kind of sweet. So this year, I went with some apple pie bars and lemon ricotta cookies. The lemon cookies are becoming a staple in my kitchen. I actually am not a huge fan - I prefer my baked goods with chocolate, not fruit. But my mom, grandma and brother love them, so I find myself making them a lot. This is the first time, however, that they have not been devoured! I chalk it up to the amount of food everyone ate at dinner, though - the cookies themselves were light (because of the ricotta) and absolutely packed with lemon flavor. The lightness makes them a nice change for this time of year, when we've begun to turn back to the heavy, chocolate-laden Valentine's Day sort of desserts.

Lemon Ricotta Cookies
I actually got this recipe from a cooking class at Rutgers, but I think it's originally from Giada.

for the cookies:
2 1/2 c flour
1 tsp baking powder
1 tsp salt
1 stick butter
2 c sugar
2 eggs
15 oz whole milk ricotta cheese (I started using organic ricotta, which seems to be a bit more watery than the regular kind - this made my cookies spread a bit more than usual)
juice from one lemon (~ 3 tbsp)
zest from one lemon (if you end up with long strips like I did, chop them a bit to break them into small bits)

for the glaze:
1 1/2 c powdered sugar
juice from one lemon (definitely use fresh lemons - the flavor will be much better!)
zest from one lemon

Preheat the oven to 375°. Sift together the flour, baking powder and salt. In the bowl of a stand mixer, cream together the butter and sugar for about 3 minutes, until light and fluffy. Add eggs one at a time, scraping down sides after each one. Add the cheese, lemon juice and lemon zest and stir until combined. Stir in the dry mixture until just combined.

Spoon the mixture in tbsp increments onto parchment-lined baking sheets. Bake about 15 minutes, until the middles are set and they're just golden at the edges. Remove from the oven and let rest on the baking sheets for about 20 minutes.


When the cookies are ready to glaze, combine powdered sugar, lemon juice and zest in a small bowl and stir until smooth (I might reduce the amounts next time, because I only used about 2/3 of the glaze). Spoon about 1/2 tsp glaze onto each cookie and spread it gently with the back of the spoon. (I find it easiest to glaze the cookies while still on the parchment, to reduce the mess - I used to do it with the cookies on cooling racks and it was a drippy disaster!) Let the glaze harden for about 2 hours (I did this, and then put the cookies into a tupperware which allowed the glaze to re-moisten. I think the only solution is to not make these too far in advance, so you can keep them out).

Sunday, January 16, 2011

Chicken Cacciatore


It's good to be back in the kitchen.

The last month or so has been crazy. We've been out of town, at parties - eating everywhere but at home. But we're now back to our regular routine of cooking three to four times a week. Usually, that cooking includes two or three new recipes. When I put together the menu for the current week or so, I was obviously suffering from kitchen withdrawal, because every recipe on the list is new. That's ten new recipes in ten days. Today alone I did two of them.

This post is focusing on the entree: chicken cacciatore. I don't believe I'd ever eaten this before, but it looked like some great Italian comfort food. I've been yearning for something that I could leave simmering on the stove, filling the house with beautiful aromas. This was definitely it. First the house smelled browning chicken. Then like sauteed peppers and onions, then sweet roma tomatoes. And the flavors were as delicious as the aromas. The meat was fairly tender, although I think a longer simmer could make it fall-off-the-bone tender. The sauce was deliciously complex, with layers of flavor interacting: the garlic, the wine, the browned chicken skin, the delicious sweetness of the tomatoes, the fresh herbs.

What surprised me the most about this recipe was its lightness. When I put this on my menu, I expected a heavy Sunday dinner, but it was far from it. Now, part of that was due to our own reduction of the recipe. Jeff and I decided we had too many leftovers lying around and skipped the chicken breasts, which left out more than half the the meat. Also, I really should have put it over some sort of pasta (which is what I think I'm going to do with the leftovers tomorrow!). Still, a single chicken thigh with a thick, vegeabley sauce was exactly what I needed after weeks of sweet and heavy meals. And the buttermilk chive biscuit and roasted broccoli I served with it put it over the top. Don't worry - you'll get the biscuit recipe soon! 


Chicken Cacciatore
Courtesy of Giada de Laurentiis.

4 chicken thighs, skin-on and bone-in
2 chicken breast halves, skin-on and bone-in, halved crosswise
2 tsp salt
1 tsp pepper
1/2 c flour
3 tbsp olive oil
1 red bell pepper, chopped (the recipe wasn't specific about this - I did a rough dice)
1 onion, chopped
3 garlic cloves, finely chopped
3/4 c dry white wine
28 oz can diced tomatoes, with juice
3/4 c low sodium chicken broth
3 tbsp capers, drained
1 1/2 tsp dried oregano
1/4 c fresh basil, chopped

Sprinkle chicken with 1 tsp salt and 1 tsp pepper. Dredge in flour to coat lightly.


In large sautee pan, heat oil on medium-high. Add chicken to pan and saute until brown, about 5 minutes per side (do in multiple batches if necessary). Transfer chicken to a plate and set aside.
 

Add garlic, onion and bell pepper to the same pan and saute over medium heat until onion is tender, about 5 minutes. Season with salt and pepper.


Add wine and simmer until reduced by half, about 3 minutes. Add toamtoes and juice, broth, capers and oregano.

 
Return chicken to the pan and turn to coat with sauce. Bring the sauce to a simmer. Continue simmering over medium-low heat until chicken is cooked through (20-30 minutes).

Transfer the chicken to a platter. Bring the sauce to a boil until it thickens (3-5 minutes). Spoon off any excess fat. Spoon sauce over chicken, sprinkle with basil and serve.

Thursday, December 23, 2010

Biscotti


I've gone from Italian cookies to Polish cookies and back to Italian. Actually, I've gone a great deal farther than that. I've baked at least nine batches of cookies since last week, not to mention making poppy seed cake, which is a day-long venture in itself. I'm actually quite sick of baking. Sick enough that when I realized the bottoms of the biscotti burned, I decided to go with it, even though I'm giving them as a gift. Ninety percent of each cookie is fine. Isn't that good enough?

I make these biscotti a few times a year, always as a gift to my grandfather. Seriously - what is there to buy an eighty-five year old man? He likes the biscotti, so I continue to make them. I do vary the flavors a bit. The recipe says to use anise extract, which is pretty traditional in biscotti. I abhor anise, however, so I won't use it. I succumbed and did it once, but just the smell of it in my kitchen gave me a splitting headache. Since then, I tend to switch between vanilla and almond. I suppose hazelnut might be good as well - maybe I'll try adding some Frangelico next year . . . This time, as a twist (and to get them out of my cabinet) I tossed in some slivered almonds. I think they added a nice texture to the finished product.

These are easy enough to make (except don't overgrease the pans - I think that's how I burned the bottoms) and make a nice gift. I generally tuck them into a pretty tin and stick a bow on top. You may still have time to get a batch in as a last-minute gift!

Merry Christmas everyone!

Biscotti
I've been using this recipe for several years now. I don't remember where I got it.

1/2 c vegetable oil
3 eggs
1 c sugar
1 tbsp almond extract 
3 1/4 c flour
1 tbsp baking powder
1/2 c slivered almonds

Preheat oven to 375°F. Lightly grease a cookie sheet.

In a medium bowl, combine oil, eggs, sugar and almond extract. Whisk until well blended. In a larger bowl, combine flour, baking powder and almonds. Whisk well. Add the egg mixture and stir until a heavy dough forms.


 (I often find it is necessary to knead it a bit to fully blend everything together. There are lots of floury bits that try to stay at the bottom of the bowl and not blend with the rest. Kneading will get most of them.)


Divide the dough in half. Form each half into a roll about as long as your baking sheet (I did a really nice job of the rolling this time. I usually end up with awkward, ungainly logs, but this time they're pretty consistent-looking). Press the rolls down to about 1/2" thickness.


Bake 25-30 minutes (until golden brown - and not burned on the bottom!). Cool on a wire rack.

When cooled, take each roll and cut into 1/2" slices (mine were a bit bigger this time, but I think it is better to err on the side of large - smaller ones will tend to crumble more at the edges. On that note, I find it easier to slice them with a carving knife, rather than a serrated bread knife. Serrated knives tend to make the edges crumble).


Place the slices side-by-side on a baking sheet. Bake for about 5 minutes on each side (you might want to check them - try not to let them burn!) until lightly toasted. Cool and enjoy!