Wednesday, March 28, 2012

Brussels Sprout Slaw with Mustard Dressing and Maple-Glazed Pecans


It may feel like spring (or even summer, some days), but it's still March. While I do have a perky little row of radish tops in my garden, spring vegetables won't be available locally for several weeks yet. How does a conscientious locavore balance cravings for light, springy meals with the heavy winter vegetables available at the market? Ingenuity, of course.

I found this salad in Bon Appetit's Thanksgiving issue a few years ago (I never said it was my own ingenuity!). While Brussels sprouts may be a traditional holiday vegetable, this is not a traditional holiday preparation. It's light and airy contrast to most Thanksgiving side dishes. Those same qualities make it a great way to transition into springtime, too.

For a light dish, this packs a hefty flavor punch. The sharp, mustardy flavor of the sprouts (emphasized by the mustard dressing) contrasts well with the sweet and salty candied pecans. While I love it with pecans, I've also done it without to make it low-cal. The sprouts definitely have a bitter edge on their own, but when paired with several heavier holiday dishes, it's still light and tasty. Bonus! This is one of those dishes that gets better with time - the Brussels sprouts will hold up against the dressing for several days, losing a bit of their bite and becoming more delicate. That makes it a great make-ahead side dish for a party or an easy portable lunch.


Brussels Sprout Slaw with Mustard Dressing
From Bon Appetit November 2009.

1 c pecan halves
1/4 c maple syrup
1/2 tsp + 1 tbsp kosher salt
1/8 tsp black pepper
1/4 c whole grain Dijon mustard
2 tbsp cider vinegar
2 tbsp lemon juice
1 tbsp sugar
1/8 c canola oil
1 1/2-2 lbs Brussels sprouts, stems trimmed and any icky outer leaves removed (I cut any particularly large ones in half as well)

Preheat oven to 325°F. Line a sheet pan with foil (no cooking spray needed). Spray another sheet of foil with cooking spray and keep it ready (to cool the pecans on - the cooking spray keeps them from permanently adhering to the foil). Whisk the maple syrup, pepper and 1/2 tsp salt in a small bowl. Add the pecans and toss to coat. Spread in a single layer on the baking sheet. Bake about 5 minutes, remove to stir, then another 5-6 minutes. Remove from the oven and quickly transfer the pecans to the cooking-sprayed sheet of foil. Using a fork, spread the pecans out and separate any big clumps (the syrup solidifies quickly so you'd better hustle!).


Meanwhile, bring a large pot of water to a boil. Add 1 tbsp salt. Add the Brussels sprouts and cook 5 minutes. Drain and rinse. Set aside to cool for a few minutes.

Meanwhile, make the dressing. In a small bowl, whisk together the mustard, vinegar, lemon juice, sugar and canola oil. Season with salt and pepper to taste.


Slice the Brussels sprouts in a food processor (slice, don't shred - when they're shredded the pieces end up too small). Transfer to a large bowl and toss with dressing. Let marinate 30-60 minutes. Mix in pecans and serve.


Saturday, March 24, 2012

Triumph Brewing Company, Philadelphia


Two weeks ago I wrote that dealing with a complicated diet while traveling is not difficult. I suppose that depends on where and how you're traveling, because I found this past weekend's trip to Birmingham, Alabama much trickier.

I suppose one of the issues was the difference between train travel and air travel. When I took the train to Toronto, I brought most of my meals for the day along with me - I only had to rely on the train's offerings for one meal. Flying is different - since we had limited room in our carry-on bags, and the possession of liquids and pastes is a serious threat to national security, we had less leeway in what foods we could bring with us (though we did stash a supply of the pumpkin-apple granola bars!). Add to that the fact that we were traveling in the South, where no dish is served without a generous amount of meat and butter, and things got tricky. A few times over the weekend, I violated my Lenten vegetarianism in order to stick with my medically necessary low-cholesterol diet (especially since I knew I'd be violating that with a slice of wedding cake). The most annoying moment was when I laboriously picked through the lunch offerings at the Atlanta airport, chose a nice salad that fit my dietary requirements, and opened it to discover a pile of chicken which was not on the ingredient list. Clearly, the stars were aligned against me. It's a good thing that I'm not a real vegetarian (in the sense of being morally opposed to eating meat).

It was comforting to know that this food stress would cease Monday evening, when we landed in Philly and drove into the city for dinner. Before our trip, I had scoured the internet for a good restaurant with vegetarian offerings, ideally serving local and seasonal food. I was surprised to find exactly what I was looking for at the Triumph Brewing Company. I had been to Triumph in Princeton several years ago, but I thought of it as an upscale college burger-and-beer joint. At least, I remember having a burger and Jeff had a beer. Triumph's culinary offerings are actually far more extensive and delicious than I had recalled, and I was delighted to learn that the Philly location offers a whole menu of locally-sourced, seasonal eats, in addition to their regular menu (which also seemed appropriately seasonal, although the veggies it featured are not yet ready to harvest locally).


I loved the transparency of the menu, listing the source for nearly every ingredient in the local offerings. I ordered the Phillip's Farm curried sweet potato soup with Solebury Orchards keepsake apple crème fraiche and Tog Farms onions.


The soup was as delicious as it sounds. It had an amazing velvety texture (which I sincerely hope was not achieved with copious amounts of butter - the crème fraiche was already violating my diet!). The crème fraiche was delightfully tart and creamy and fresh all at once, with hearty chunks of apple and onion throughout. The curry was muted enough that it did not conflict with the other flavors. It was truly a soup to savor.

I also ordered the spring vegetable quesadilla off of the normal menu, which included spring onions, peas, mushrooms, smoked mozzarella and a poblano cream. This was probably the lightest, most flavorful quesadilla I've ever had at a restaurant. Usually the tortillas end up greasy and soggy, oozing cheese all over the plate. This one was delightfully un-greasy with exactly enough cheese to hold things together without overwhelming the other ingredients. I am not a huge mushroom fan, but since they were sliced nice and thin, I got all the savory mushroom flavor without the rubbery texture that I don't like - perfection, in my book. The peas were a fresh, springy touch and the poblano cream offered just a hint of heat. The whole combination was great and really got me looking forward to the day these spring ingredients start popping up at my local farmers market!


Jeff ordered the lengthily-titled Oak Grove cornmeal crusted Captain Rodrick Murry scallops with Phillip's Farm sweet potato and collard greens with Tog Farms onions, tasso and buttermilk beurre blanc. The scallops were perfectly cooked - tender, but firm enough to hold together - and nicely seasoned. The simplicity of roasting allowed the inherent flavors of the sweet potato to shine. The collards were also beautifully cooked - tender enough to eat but still had a bit of a bite to them. The little bits of tasso ham provided bursts of saltiness and smokiness throughout. Triumph definitely gets some points for plating here, too - the food looked fantastic!


All in all, a delicious meal on a gorgeous early spring day in Old City, Philadelphia. Since the Home Grown menu changes frequently to take advantage of seasonal offerings, I plan on returning soon to see what tasty new dishes Triumph has cooked up!

Monday, March 12, 2012

Broccolini with Smoked Paprika, Almonds and Garlic


With my birthday just a few weeks away, I've been trying to finish up my 30 x 30 challenge. As of last week, I still needed to try five or six things, so I went out of my way to add new foods to our menu. One of the first things that came to mind was this broccolini recipe I had gotten from Bon Appetit over two years ago. At the time, I had torn the page out of the magazine and pinned it to my kitchen bulletin board (code for "make this immediately"). Unfortunately, I had no luck finding broccolini at the grocery store. Eventually, I unpinned the recipe and filed it away.


When I was planning this week's menu and contemplating new foods to add, I pulled this recipe out once again. I remembered seeing broccolini at the store  recently, so I added it to the list and crossed my fingers. I was in luck - Whole Foods had a huge pile of the stuff in stock. And good thing, too, because this amazing recipe did not deserve to languish in a folder for so long.

This dish is fast, simple and delicious. I like how sparing it is - just a few ingredients, but they all manage to shine. The nuts are toasted in oil with garlic and smoked paprika, then tossed with the steamed broccolini later. Since the steaming is done in the same pot, any remaining spicy oil is absorbed into the broccolini as it cooks. This is good, because smoked paprika is the epitome of spices. It is my new favorite thing. Paprika adds a lovely warmth to any dish without any mouth-tingling heat. When that warmth is combined with a deep smokiness, a drool-worthy condiment is created. I promise I will be finding more ways to use this soon. That flavor added to a fresh, green vegetable with crunchy nuts and a dash of vinegar makes a beautifully balanced side dish. I've made it twice in twenty-four hours and I'm already craving more!

Broccolini with Smoked Paprika, Almonds and Garlic
Adapted from Bon Appetit, November 2009.

1 1/2 tbsp olive oil, divided
2 tbsp sliced almonds
1 large garlic clove, minced
1/2 tsp smoked paprika (I'm sure regular paprika would be nice, but it's the smoked kind that really makes this recipe shine)
kosher salt
1/2 lb broccolini, cut into 2-3" lengths
1/4 c water
1 tsp sherry vinegar


Heat 1 tbsp oil in a large, heavy saucepan over medium- high heat. Add the almonds and cook 2-3 minutes, stirring, until they begin to brown. Add garlic and paprika, sprinkle with salt and stir for about a minute. Transfer to a small bowl.

Add remaining 1/2 tbsp oil to the same pot. Add broccolini, sprinkle with salt and toss to coat. Add 1/4 c water, cover and cook 3-4 minutes, until broccolini is bright green and water has cooked off. Stir in almond mixture, season again (if necessary), and stir in sherry vinegar. Enjoy!

Thursday, March 8, 2012

Pizza with Roasted Peppers, Spinach and Smoked Mozzarella


Today I am launching the new redesign of my blog! One of my resolutions this year was to improve the blog, and with improvement comes increasing professionalization. Jeff got me business cards and my own domain name and I decided to spring for some photo editing software (I'm sure you're shocked to learn that up until now all my photos have been unedited - well, all but two or three, which I applied poor fixes using the software that came with my camera). Now I've switched to a more streamlined blogger template that better matches my business cards. Let me know what you think! I still have some tweaking to do, so I'd love to hear your feedback!

Now, about this pizza. I have been working on improving my pizza making technique as well, and it has certainly paid off. The key is preheating the pizza stone. As soon as the crust touches the hot stone it starts bubbling and cooking through. I have a small pizza stone, so I'm not willing to try my luck sliding a pie on using a pizza peel, but I've found that taking a little time to assemble it doesn't make much difference in the final product (I do try to make sure my ingredients are prepped and ready to go - I wouldn't recommend wandering around the kitchen grabbing things for fifteen minutes while the dough is on the stone, but the five minutes it too me to assemble and photograph the pie was ok). What's lovely about this method is that the crust, rolled thin, gets nice and crispy on the bottom - a feature that had eluded me when I tried other methods. If you can resist eating it right away, it gets even crispier if you remove it from the oven and let it rest on the stone for a few minutes (I have a hard time with waiting, frequently burning the roof of my mouth on my pizza). 

While any toppings will do, this is a particularly awesome combination. Jeff had a hard time believing that there was no bacon on the pizza - the smokiness of the mozzarella brings a real meatiness to the table. The earthiness of the spinach is balanced by the sweetness of the roasted peppers, and it's all brought together by the beautiful acidity of the sauce.

The sauce I used is home-canned Tomato Basil Simmer Sauce from Better Homes and Gardens. It tastes like concentrated summer. The peppers were also home-roasted and frozen. That was one of the best preserving projects I undertook last summer. I still have more than a quart of frozen pepper strips. I'm looking forward to devise more delicious ways to use them up. I'm also looking forward to posting directions for various preserving projects this coming summer, so more people can experience the delights of a slice of August in the middle of March!

Pizza with Roasted Peppers, Spinach and Smoked Mozzarella
dough:
2 c bread flour
2 tbsp dried basil
1/2 tsp salt
1/2 tsp sugar
1/4 oz instant yeast (1 package)
3/4 c hot water (115-120°F)
1 tbsp olive oil

toppings:
2/3 c tomato sauce
1/3 c roasted red peppers, thinly sliced
2-3 oz smoked mozzarella (I used a wedge of cheese, which I sliced thin and then cut into squares. Shredded cheese would work just as well, but I wanted a more rustic, artisan look)
several handfuls baby spinach (it cooks down in the oven, so be liberal)

Combine the flour, basil, salt, sugar and yeast in a large bowl. Add the water and 1 tbsp olive oil and stir until the dough comes together. Turn out on a lightly floured counter and knead for about 7-9 minutes, until smooth and elastic.

Place the dough in an oiled bowl, cover with a damp kitchen towel and let rise in a warm place for about an hour. Meanwhile, place your pizza stone in the oven and preheat to 475°F.

When the rising is done, divide the dough in half (a dough scraper is perfect for this). If you don't want to make two pizzas, put the extra ball of dough in a container in the fridge for a few days, or the freezer for a few weeks. Place your other ball of dough on a lightly floured counter and roll out into a thin circle (or roundish blob, like mine - I try to roll it a bit larger than I want the finished pizza, because it inevitably shrinks when I pick it up).


Remove the piping hot pizza stone from the oven and place on the stove top. Quickly arrange your dough on the stone. Spread tomato sauce on top with the back of a spoon.


 Arrange your cheese and pepper slices over the sauce. Try to get even coverage.


Toss a few handfuls of baby spinach on top (no chopping necessary!).


Return to the oven for 6-10 minutes, until it reaches your desired level of doneness. Let cool on the pizza stone for a minute or two, slice and enjoy! 


Sunday, March 4, 2012

Stuffed Curry Sweet Potato


I totally wish I had one of these right now. This delicious sweet potato was made and consumed over a week ago. I sneakily stocked up on stuff to blog about, knowing I had many long hours of train travel to fill. So I sit here, rocking to the rhythms of the last car of the train somewhere between Buffalo and Rochester (actually, we seem to be passing near Attica - I'll be on the lookout for escaped convicts), mentally drooling over this healthy, flavorful lunch as I try to write about it.

Actually, my lunch today wasn't half bad. I got a pretzels and hummus snack pack on the train and followed it up with some vegetable crudites I got to take home from the conference yesterday (it pays to get to know the local grad students). But there is no question that I would rather have had this potato.

When this recipe showed up on Naturally Ella, I spent some time drooling over it, but for one reason or another months passed before I actually tried it. Warm, mashed sweet potato blends with dense chickpeas and a pile of curry powder for a healthy, tasty and well-balanced entree. It's a great go-to recipe to keep in your repertoire - the most time-consuming part is baking the potato. The first time I made it, I forgot how long that can take. Just make sure you plan ahead and you'll be fine.

I think I'm going to have to make one of these for dinner tomorrow. Or maybe lunch - dinner's too far away!

Stuffed Curry Sweet Potato
Very slightly adapted from Naturally Ella.

1 medium sweet potato
1 tbsp olive oil
1 small onion, diced
1/2 red bell pepper, diced
1 clove garlic, minced
1/3 c frozen peas, thawed slightly
1/2 c chickpeas
2 tbsp vegetable stock
1 tbsp curry powder

Preheat oven to 400°F. Poke some holes in the sweet potato and place it on a baking tray. Bake 45-50 minutes, until softened. Remove from oven and set aside to cool slightly.


Heat the olive oil in a small skillet over medium heat. Add in onion, pepper and garlic and saute a few minutes until translucent. Add in chickpeas and frozen peas and cook until heated through. Set aside.


Lower the oven temperature to 375°F. 

Slice the sweet potato in half and scoop out the insides, leaving 1/4" or so around the edge (I like to use a melon baller for this). Mash the removed sweet potato well, then add curry powder and stock. Set aside about a third of this mixture, and combine the rest with the chickpea mixture. Stuff the sweet potato shells with it, then cover (as best you can) with the reserved sweet potato mixture. Place back on the baking tray and return to the oven for 15-20 minutes. Enjoy!


Thursday, March 1, 2012

Pumpkin-Apple Granola Bars with Chocolate Chips


I'm currently sitting on a train through the lovely snow-covered Hudson Valley, headed to Toronto for a weekend conference. One of my big worries leading up to this trip has been about food. This is the first traveling I've done since instituting my low cholesterol diet. To top it off, I'm not eating meat right now either. While a twelve-hour train ride is otherwise a rather enjoyable way to travel, I worried that the cafe car offerings would not work for me.

My solution was to bring a cooler bag full of food. I packed myself a chickpea and spinach salad for lunch. I brought a large chunk of the tasty focaccia I made the other day. I made some buttermilk ranch popcorn and a batch of these awesome granola bars. I was going to pack some clementines, and then I remembered the last time I took this trip, when customs officials confiscated the orange of the man sitting in front of me (don't try to bring citrus fruits across the border - it's not worth it). Now I sit on the train in comfort, worry-free. I will buy a cafe car salad for lunch, while they're still stocked (last time they ran out of substantial food by dinnertime), then eat the rest of my stash in comfort as the day goes on. Tricky diet + travel = no problem.

The granola bars are definitely the most important item in my cooler bag. Not only are they healthy and filling, but they keep really well. Most of my food won't last past today (the popcorn could, but it tends to get stale quickly), but these granola bars will keep me happy all weekend long. Besides binding things together, the applesauce keeps them nice and chewy. I think my homemade applesauce is really the key to these. I canned a big batch using tart Stayman Winesap apples from Terhune Orchards in October. The tartness and the fresh apple flavor are shine through more strongly than the pumpkin in these bars (my homemade pumpkin puree is also a bit weak). I don't think store-bought applesauce would pack the same punch.

I don't mean to deter you, of course, from trying this recipe with store-bought ingredients! I have made these with store-bought pumpkin as well and gotten a stronger pumpkiny flavor. They will be a delicious snack whatever your ingredients - I just get the added bonus of autumn memories with mine!

Now that we've passed through Albany and are heading down the Erie Canal, I think it's high time for my snack. Excuse me while I enjoy a chewy, spicy, appley, chocolatey granola bar and enjoy the view.

Pumpkin-Apple Granola Bars with Chocolate Chips
Slightly adapted from Comfort of Cooking.

3 1/4 c rolled oats
1/4 tsp ground nutmeg
1/8 tsp ground ginger
1/8 tsp ground cloves
1/2 tsp ground cinnamon
1/2 tsp salt
3/4 c light brown sugar
1/2 c pumpkin puree
1/4 c unsweetened applesauce
1/4 c honey
1 tsp vanilla extract
3/4 c chocolate chips

Preheat oven to 350°F. Spray an 8 x 8 baking pan with baking spray.

Whisk oats, spices and salt together in a large bowl. In a smaller bowl (or Pyrex measuring cup), combine the sugar, pumpkin, applesauce, honey and vanilla. Pour over oat mixture and stir well until all the oats are coated. Stir in chocolate chips.


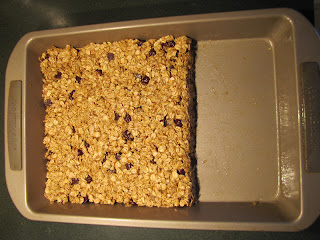
Spread the mixture in the prepared pan. (If your 8 x 8 pan is in use, like mine was, you can use a portion of a larger pan. The mixture stays where you put it.) Press the granola together firmly, or it will crumble when you try to cut it later! (I actually liked using a big pan for this very reason - it allowed me to pack everything together more tightly. I still had some bars fall apart as I cut them, but not as many as last time.)


Bake for 30-35 minutes(around 40 if you use a glass baking dish), until golden brown and set. Let cool completely before cutting.