Tuesday, October 25, 2011

Sweet Potato Fries with Cranberry Ketchup


Every month when my cooking magazines arrive, I devour them quickly, tearing out and cataloguing all the recipes that appeal to me. Then those recipes go into a folder, not to be looked at for several months. No matter how good a recipe looks, it seems like I'm always a few months behind. My menus are dictated more by the produce I have available than the recipes that show up. When my October magazines arrived, I was still in high summer, trying to use up my tomatoes and basil. I was not ready to think about winter squash and sweet potatoes, delicious though they are.This month, however, worked out better. When my November Cooking Light arrived a few days ago, my cupboard was bare. I was ready for sweet potato fries with cranberry ketchup. And cranberries have just come into season in New Jersey.


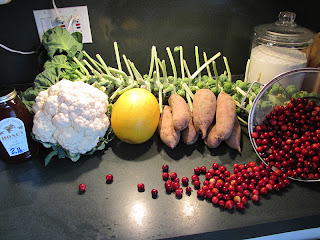
I went to the farmers market this morning and was delighted to see the bins of fresh cranberries, along with the other fall goodness pictured above (so many of my favorite vegetables are in season right now!). New Jersey is a big cranberry-producing state (Ocean Spray is actually headquartered about ten miles south of here in Bordentown - though I hear they'll be moving by next year). I'd been planning to take advantage of this cranberry bounty for some time, but I knew my timing had to be good. Last year I saw cranberries at the farmers market and stored that info in the back of my mind for Thanksgiving, when I would need them. But when Thanksgiving weekend rolled around, there were no cranberries to be had! The harvest had ended early. This year, I was assured this morning, they will still be around by then. But that doesn't stop me from enjoying some now!
 
This cranberry ketchup is easy to make and absolutely delicious. The tart sweetness of the cranberries holds up well against the zing of the vinegar and the heat of the red pepper flakes. While cranberries and sweet potatoes seems like a Thanksgiving-y combination, this recipe manages to evoke fall flavors without a holiday connotation. I'm sure it would be as good as a side dish for a family dinner as it was as my Tuesday lunch!
 

Sweet Potato Fries

1 1/2 to 2 lbs sweet potatoes, sliced into wedges
1/2 tsp dried thyme
1/2 tsp dried oregano
salt and pepper to taste
1 tbsp olive oil

Preheat oven to 425°F.

Combine all the ingredients in a bowl and toss to coat.


Spread the wedges on a foil-lined baking sheet. Bake for 20 minutes. Remove from the oven, flip the wedges, and return to the oven for another 15-20 minutes. Serve nice and hot!


Cranberry Ketchup
From Cooking Light November 2011.

1 2/3 c fresh cranberries
1/2 c dark brown sugar
1 large shallot, chopped
1/4 c cider vinegar
1/4 c water
1/2 tsp salt
1/2 tsp red pepper flakes


Combine all the ingredients in a medium saucepan.


Bring to a boil over medium-high heat (you will start to hear the cranberries burst as they heat up). Cook 10 minutes, until thick, stirring every few minutes.


During those 10 minutes, the mixture will go from foamy and popping to deep red and gelatinous.


After the 10 minutes are through, once the mixture has gelled, remove from the heat and let rest for 10 more minutes.


Once the mixture has cooled a bit, transfer to a food processor (I used my small one) and process until smooth. Enjoy with sweet potato fries!

Tuesday, October 18, 2011

Apple Crumb Pie and Blog-i-versary


Today marks my first blog-i-versary! My blog was born a year ago today. In that time, I've written eighty-four posts, between six and nine per month (except for those months when I was overseas). I now get around two hundred hits per month. Blogger tells me that I have nine followers, but I know there are more that follow via blog readers who aren't counted. Not bad for an enterprise that I am reluctant to promote.

I have two resolutions for my next year of blogging. The first is to try to promote the blog a bit. I'm toying with the idea of business cards. At the very least, I need to bring it up in conversation with people. The second resolution, which I'm already working on, is to take better pictures. I need to learn more about my camera and work on food styling. I can't fix the terrible lighting in my kitchen, or the ugly green countertop, but I can find new places to take my pictures. Here's to another fun year of recipe testing!

To celebrate my blog-i-versary, I made a pie from the lovely fresh apples I mentioned in my last post. I have grown to love apple pie, but I have no interest in the double-crusted varieties. I don't really understand the second crust - I suppose that I don't love pie crust enough to appreciate it. I'd much rather have sugary, cinnamony crumbs atop my pie. So that's what we have here. A little allspice and nutmeg gives the pie a nice kick. Served with a scoop of vanilla ice cream, it's the perfect fall treat!  

Apple Crumb Pie
Adapted from Baking Bites.

Crust: 
1 1/4 c flour
1 tbsp sugar
1/2 tsp salt
6 tbsp cold butter
4 tbsp ice water

Filling: 
3 large apples
2 tsp lemon juice
1/2 c light brown sugar
2 tbsp flour
1 1/4 tsp cinnamon
1/2 tsp allspice
1 tsp vanilla extract

Crumb topping:
1 1/4 c flour
1/2 c brown sugar
1 1/2 tsp cinnamon
1/4 tsp nutmeg
1/4 tsp salt 
1/2 c butter, melted and cooled

Prepare your crust:
Put flour, sugar and salt in a food processor and pulse to combine. Cut your butter into teaspoon-sized pieces and add to the flour mixture. Pulse until the butter is no bigger than pea-sized and blended into the flour. Add water until a ball of dough forms. Make that ball into a disc, cover in plastic wrap and chill about an hour.


Preheat the oven to 425°F. Remove the dough from the fridge and roll out on a floured surface into a circle that fits your pie pan (I used a 9" pan, but I think this recipe could fit any pan from 8-10").


Transfer the crust to your pie dish.(Mine was pretty firm, so I just lifted it with my hands. If your dough seems more delicate, you may want to wrap it around your rolling pin to make the transfer.)Press in gently to fill the dish.


Use your knife to cut off the excess dough, or run your rolling pin over it (my preferred method, although the little handles on my pie dish get in the way, so I need to touch it up with a knife). The extra dough can be re-wrapped and refrigerated or frozen for later use (I generally use these to make tiny pies later on).


Make the filling:
Put the lemon juice in a medium bowl. Peel, core and thinly slice the apples, adding them to the bowl and tossing with lemon juice as you go. Mix in the rest of the ingredients and toss to combine. Let stand a few minutes.


Prepare the crumb topping:
In another bowl, whisk together the flour, sugar, cinnamon, nutmeg and salt. Add the melted butter and stir until crumbs form.


Pour the apple mixture into your pie crust in an even layer.


Sprinkle crumb topping on top, being careful to cover the apples completely.


Bake for 20 minutes at 425°F. Lower the oven temperature to 375°F and bake for an additional 35-40 minutes. If the crumbs begin to brown too much (like mine did), you might want to cover the pie with foil. Cool before cutting. Serve with a nice scoop of vanilla ice cream!

Sunday, October 16, 2011

Pumpkin Cookies


I have a love-hate relationship with the fall. I hate it when the weather turns colder. Every few days I think I'm getting sick, because I interpret my constant chilliness as fevered chills.

On the other hand, I love the fall harvest and the food that comes with it. I love winter squash and sweet potatoes, cauliflower and Brussels sprouts. I love desserts based on apples and pumpkin. I am ready for warming comfort food.

Last week, I cracked open a big can of pumpkin I had leftover from my pumpkin craze last year. The problem with canned pumpkin is that, unless you're making two pumpkin pies, you're not going to use the whole can. I've had to make five or six different pumpkin recipes, including these cookies, since then in order to use it up. I love to use pumpkin, but it's annoying to have to use it in a short span of time. I think the solution is to stop buying canned pumpkin - I'm going to get myself a nice cheese pumpkin or two at the farmers market, make my own puree and freeze it in half-cup increments. Much more convenient. And local!

Speaking of local, Jeff and I went to Terhune Orchards yesterday to get some apples for a new batch of applesauce. I'd never been to their orchard on Van Kirk Road - only the main farm. It was nice to see another side of one of my favorite local farms. We came home with almost twenty-five pounds of apples - a whole sink-full! I know my sink is shallow, but this is still a lot of apples. I'm currently brainstorming about how to use them up!


So. About these pumpkin cookies. This is the recipe that my mom's been making for as long as I can remember. These are not pumpkin spice cookies - think of them as a cakey chocolate chip cookie packed with vitamins. The pumpkin adds texture, moisture and color, but only a touch of flavor. Depending on the moisture level of your puree, you might want to add a little more flour (I think I should have - my dough was a bit too batter-like). Since they're nice and orange, they would be a good Halloween treat!

Pumpkin Cookies
My mom's recipe.

1 c flour
1/4 tsp salt
1/2 tsp baking powder
1/2 c sugar
1/2 c butter, softened
1/2 c pumpkin puree
1 tsp vanilla
1 egg, lightly beaten
1/2 c chocolate chips (or more, to taste!)
In a medium bowl, whisk together flour, salt and baking powder.

In a stand mixer, cream the butter and sugar together until fluffy. Add the pumpkin, vanilla and egg and beat until combined.


Add the flour mixture to the stand mixture and beat on low speed until just combined. Stir in chocolate chips.


Refrigerate the dough for an hour or so, until chilled. Preheat oven to 350°F and grease baking sheets with baking spray. Scoop out tablespoon-sized balls of dough and place on the baking sheets.


Bake for about 15 minutes, until edges are lightly browned. One batch makes about two dozen cookies.


Friday, October 14, 2011

Pasta with Swiss Chard, Bacon and Parmesan


I'm really getting into these quick pasta dishes. We first put this on the menu two weeks ago, and it kept getting bumped back: too many leftovers, going out to eat, no time to cook. Jeff finally made it on a day that I was teaching and getting home late. I walked in the door to a steamy, bacony, earthy smell. When the dish was ready, we absolutely devoured it. I think there should have been leftovers, but all the extra bites we snuck out of the pan took care of those. When I got another bunch of chard from the farm a few days later, I knew there was no other option. And I knew all of you had to hear about it.

This time we only made half the recipe, since it was a small bunch of chard, but I'm giving you the whole thing here. As you can see in the pictures, half the recipe filled my pan pretty well. When we did the whole thing, Jeff needed a separate bowl to toss the pasta and fixings in.

This dish is full of flavors I love: earthy chard (you may remember that my initial reaction to chard was ambivalent, but I've since hopped on the bandwagon), meaty bacon, zingy lemon and salty Parmesan. The original recipe assumes you are using thin, packaged supermarket bacon. We use thick-cut butcher bacon, so we reduced the number of strips. This means that it produces a bit more fat, reducing the need for oil, and doesn't crisp up quite like thinner bacon would. On the other hand, it has a rich, meaty flavor that thin bacon can't match. Combined with the chard, which is almost meaty in its own right, it produces a wonderfully hearty, but not heavy, dish, perfect for a low-meat, vitamin-rich meal!

Pasta with Swiss Chard, Bacon and Parmesan
Adapted from Rachel Ray's 365: No Repeats.

1 lb chunky pasta (I used tricolor rotini, because I had it in the pantry)
2 tsp olive oil (add more if you need to, but if you have nice fatty bacon, this should be plenty)
3 slices thick-cut bacon, chopped
4 garlic cloves, roughly chopped
1 small onion, roughly chopped (I used red onion for some extra flavor and vitamins - purple vegetables are good for you!)
1/4 tsp red pepper flakes
1 bunch Swiss chard, cleaned, de-ribbed and roughly chopped
1 c vegetable stock (we used homemade stock)
juice of 1 lemon
1 c grated Parmesan cheese
salt and pepper to taste (the original recipe did not call for salt, but since we used homemade stock which has no salt in it, we needed to add quite a bit)
Bring a large pot of water to a boil. Salt the water, add the pasta and cook until al dente. Reserve one cup of pasta water.

Preheat a large skillet over medium heat. Add oil and bacon and cook about 3 minutes, until the bacon begins to crisp. Add the garlic, onion, and red pepper flakes. Cook about 5 minutes, until the onions are lightly caramelized.


Add chard, toss to coat, and allow to wilt down. Salt and pepper to taste. Turn the heat up to high, add the chicken stock and about one cup of starchy pasta water. Bring the liquid to a boil, reduce the heat and simmer 6-7 minutes.


Add lemon juice to the chard mixture. Turn off the heat. Drain the pasta well (if you haven't already), then add it and the Parmesan cheese to the greens and toss well (you may need to do this in another bowl). Serve immediately!

Tuesday, October 11, 2011

Tuscan Lemon Muffins


I made these muffins last week. I still don't know how I feel about them.

I was looking for a recipe that would use up some leftover ricotta cheese and lemons. I was also looking for breakfast. This seemed to fit the bill.

Muffins are always quick, and these were no exception. It's a very easy recipe to whip up and toss into the oven. So far, it doesn't sound so bad . . .

The problem is the flavor. They are lemony, yes. But they're also cheesy. I don't normally think of ricotta as a cheesy cheese, but there was clearly something cheesy about these muffins. Weird, right? Ricotta does give baked goods a bit of a spongy texture, so I expected that. But I didn't expect the the cheesiness. Perhaps it was the brand of ricotta I used (Organic Valley). Perhaps it was the strength of my lemon. I'm not sure.

Would I do this recipe again? I'm still on the fence. I haven't written it on a recipe card, which suggests that I don't plan on keeping it. Then again, I haven't gotten rid of the magazine page yet. It's an average muffin. Low calorie and good for breakfast, uses up annoying leftover ingredients, but not something I'll be craving in the middle of the night.

October roses in the backyard.

Tuscan Lemon Muffins
From Cooking Light May 2011.

1 3/4 c flour
3/4 c sugar
2 1/2 tsp baking powder
1/4 tsp salt
3/4 c ricotta cheese
1/2 c water
1/4 c olive oil
zest from one lemon
juice from one lemon
1 egg, lightly beaten
2 tbsp demerera sugar

Preheat oven to 375° F.

Whisk together flour, sugar, baking powder, and salt in a large bowl. In another bowl, combine ricotta, water, olive oil, lemon zest, lemon juice, and egg. Add the wet mixture to the dry and stir until just moist.


Lightly coat a muffin pan with baking spray. Divide the batter among the cups (I got a dozen muffins). Sprinkle demerera sugar on top of each muffin. Bake for 15-18 minutes, until a toothpick comes out clean.


Cool in the pan 5 minutes, then remove and serve or store. (I found that these freeze well.)


Friday, October 7, 2011

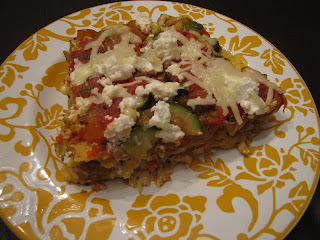
Mexican Chicken Casserole


I watched an episode of Good Eats today in which Alton Brown used leftover tortillas to make a Mexican version of lasagna with enchilada sauce. I was very amused, because I have leftovers from just such a recipe in my refrigerator right now. His recipe was startlingly similar to the one we used (from Cooking Light), although ours contains a much higher proportion of vegetables (just the way I like it). In fact, this time I really overloaded on the vegetables, using up what I had rather than following the recipe. More veggies = more healthy, right?

I originally pulled out this recipe because it sounded interesting, but I didn't actually make it for another nine months, and then only because it fit the ingredients I was trying to use up (a surplus of plum tomatoes from the farm). It turned out to be a keeper - delicious layers of fresh produce, grilled chicken, enchilada sauce, corn tortillas and cheese all melded together. I particularly like the way the corn tortillas - which can be dry on their own - get all mushy and moist in the final product. ("Mushy" is perhaps not a word with a positive connotation when it comes to food, but in this case, it's a good thing!) The fact that this can be put together a day ahead of time makes it even better - perfect for football Sundays when you just want to toss something into the oven at half time!

Mexican Chicken Casserole
Adapted from Cooking Light January/February 2011.

salsa:
8 plum tomatoes, halved and seeded (I used Plum Dandies, which seed easily and have a lot of firm flesh)
3 garlic cloves, peeled and crushed
1 small onion, peeled and roughly chopped
1 jalapeno pepper, seeded and quartered
cooking spray
1/3 c fresh cilantro (the cilantro I had waiting for this decided to kick the bucket a day early, so I used a bunch of partially-dried parsley that I had on hand - it's not the same, but sometimes you have to roll with the punches in the kitchen!)
3 tbsp lime juice (fresh tastes best, but I went with the bottled juice I had on hand)
1/8 tsp black pepper
rest of casserole:
1 c onion, chopped
1 c corn kernels (I used one ear)
1 c zucchini, diced (I used two very small ones - probably about 2 c)
1 c red bell pepper, chopped (I used the whole thing)
3 c chicken breast, cooked and shredded (I used two organic chicken breasts)
1 tbsp garlic, minced
2 tsp chili powder
1 tsp ground cumin
10 oz can green chile enchilada sauce
4 oz can chopped green chiles
12 6" corn tortillas
1 c (4 oz) shredded Monterey Jack cheese
1 c (4 oz) crumbled goat cheese

For salsa:
Preheat broiler. Coat a baking sheet with cooking spray (I lined mine with foil as well), and put tomatoes, crushed garlic cloves, small onion and jalapeno on it. Broil 20 minutes, until lightly charred. Remove from oven and cool slightly. Put the mixture in the food processor with cilantro, lime juice and black pepper. Process until smooth.


Preheat oven to 350° F. To prepare the primary casserole filling, heat a large nonstick skillet over medium-high heat. Lightly coat the pan with cooking spray (off the heat, please!). Add onion, corn, zucchini and bell pepper and saute until tender (~6 minutes). Add the chicken, garlic, cumin, chili powder, enchilada sauce and green chiles. Saute a few more minutes until heated through. (It's really tasty - I might eat it on its own, or over rice, as another option!)


Coat a 9x13 baking dish with cooking spray. Spread about 1/2 c of salsa along the bottom of the pan (this prevents the tortillas from sticking). Arrange six tortillas over the salsa. Spread half the chicken mixture on top. Top with half the remaining salsa, then half of each cheese. Repeat layers, starting from the tortillas.


Bake at 350° for 25 minutes, until nice and bubbly. Cool slightly before serving. (The leftovers are great, too - just reheat them in a toaster oven!)