Tuesday, August 30, 2011

Rustic Tomato Sauce


After much prodding by certain friends, I have finally gotten around to posting a tomato sauce recipe. Whenever I make sauce, I follow the same general plan. The differences tend to be what happens with the tomatoes (canned or fresh, peeled or not, finely chopped or chunky) and any add-ins (roasted red pepper, balsamic vinegar). Lately, I have been favoring a more rustic style of sauce.

"Rustic," in this sense, is another word for "lazy." This is a sauce you can make quickly, any day, with whatever produce you have lying around (of course, some of that produce needs to be tomatoes). I primarily used cherry and grape tomatoes (including the sweet 100s from our yard), but I also had some larger plums that were going soft, so they got thrown in as well. The tiny onions were also from our garden (those are normal yellow onions . . . they didn't do as well as I'd hoped), as are the banana pepper and herbs. The herbs for this batch include basil, parsley, thyme and oregano, but I've used others as well. What I'm saying is, this recipe is a tasty way to get rid of the spare produce you have lying around. Quantities aren't very important. Chopping is done roughly. Tomatoes are not peeled. The immersion blender is unnecessary. This sauce is delicious on top of chunky pasta, or even green beans, which is how we served this batch.

This is the time of year we should all be up to our ears in fresh tomatoes and peppers. Enjoy them while you can! Throw together a batch of tasty sauce and revel in the flavors of late summer!

Rustic Tomato Sauce

2-3 tsp olive oil
1/2 c onion, chopped (you can rough chop them by hand or throw them in the food processor for a finer chop, like we did here)
1-2 cloves garlic, minced
peppers, hot or sweet (in this case, we used both a sweet banana pepper and a hot Thai chile)
2-3 cups various tomatoes
assorted herbs, chopped roughly


Heat a medium skillet over medium heat. Add the oil and swirl to coat (you can see from the picture below that we used very little oil for this batch - it's really only necessary for cooking the onions and garlic). Add the onions, garlic and peppers to the pan and saute 4-5 minutes, until soft.


Meanwhile, chop the tomatoes. Tiny tomatoes need only be halved, but larger ones may need to be cored and diced (I quartered some of the larger cherry tomatoes. Just keep everything roughly the same size). Add them to the pan.


Simmer the tomatoes for 10-15 minutes, stirring occasionally (covering the pan helps to speed up the process, if you need to), until they reach a sauce-like consistency.


Toss in the chopped herbs and cook another 1-2 minutes. Serve over pasta, green beans, or whatever else you'd like!

Monday, August 29, 2011

Roasted Corn and Cream Cheese Baked Potstickers


When Hurricane Irene first got on my personal radar, I knew it meant no grilling outside this weekend. (Seriously, that was my first thought - only later did I realize that this storm was going to be more than just a rainy day or two.) Instead, I pulled out some of the awesome indoor recipes I've been meaning to try.

There are quite a few delicious summer recipes in my stockpile that require me to be inside at the stove. But since I generally think it's a waste not to take advantage of the grill on beautiful summer evenings, most of these recipes just gather dust. In fact, most of the time I've spent at the stove this summer has been making sauce with my bounteous harvest of tomatoes (some from the backyard, the rest from the CSA). But with lingering rain and high winds all through Sunday afternoon, it was the perfect time to delve into my neglected recipe files!

These potstickers were awesome. Roasting the corn brings out a delicious, super-concentrated flavor that melded well with the tangy Parmesan. Fresh rosemary adds an aromatic element and the smooth cream cheese binds it all together. What a delicious combo! And to make it better, since we had just finished making a pork tenderloin on the stove, we brushed the potstickers with rendered pork fat rather than olive oil, to add an extra level of flavor (and to recycle!). I have to warn you, though, that despite being baked, these are not a low-calorie treat. I put this recipe into the calorie-counting website I use and the four potstickers that I ate (a quarter of the recipe) came out over 500 calories. Yikes! But a month of record rainfall plus a destructive hurricane should count as a special occasion, right?


Roasted Corn and Cream Cheese Baked Potstickers
Slightly adapted from Naturally Ella

12-16 wonton wrappers (we got 16 out of them)
1/2 tbsp olive oil
2 ears corn, sliced off the cob
1/2 c green onions, diced
2 oz cream cheese (1/4 package)
1/2 tbsp rosemary, chopped (to release the oils)
1/2 c Parmesan
salt and pepper
water for sealing
olive oil for brushing (or whatever fat or drippings you might have on hand!)


Preheat oven to 400° F. Toss the olive oil, corn and green onions together in a bowl. Line a baking sheet with parchment paper. Arrange the corn mixture in a single layer on it, then roast for 15-20 minutes (corn kernels are small - be careful not to let them burn!). Let cool slightly. Turn the oven down to 350° F.


In a food processor, combine the cream cheese, rosemary, Parmesan, salt and pepper. Pulse until combined. Once the corn mixture has cooled a bit, add that and pulse a few times to mix. (I made the mistake of tossing everything in at once, so my corn is a bit more chopped up than it ought to be.)


Get your wonton wrappers and sealing-water ready. Spoon about 1 tbsp filling into a wrapper. With the tip of your finger, wet the edges of the wrapper, then fold to seal. My method was to bring two sides together to a peak, then fold the remaining two sides in to fill the gaps. (I had never worked with wonton wrappers before, and I didn't know how to seal them properly. And still don't, really. After a few missteps, I came up with this method which worked pretty well. A few had filling oozing out in the oven, but it wasn't a big deal. If I was planning to deep fry them, though, I think I'd have to seal them more effectively.) Repeat with the rest of the wrappers until the filling is gone.


Line up the potstickers on a parchment-lined baking sheet. Brush with olive oil (or pork drippings! You don't have to have as heavy a hand as Jeff did here, but they were delicious!).


Bake for 15-20 minutes, until golden brown (15 was enough to get mine looking like the picture below). Enjoy!

Tuesday, August 23, 2011

Grilled Pattypan Squash Skewers


Grilled vegetables are awesome. I love the grill marks. I love the little bits of char they get on the edges. I love the slightly shriveled, dehydrated look of them, because I know it promises super-concentrated flavor.

I'm sure I've mentioned that I never liked summer squash - I've only begun to eat it this summer, and primarily via the grill. Well, this is becoming my favorite kind of squash to grill. I'd never eaten pattypan squash before. To be honest, I'd thought it was a winter squash variety when I'd seen it at the farmers market. But when it appeared in a bin with the zucchini at my CSA, I figured things out. I love winter squash, but summer squash is super-easy - no thick skin to peel, no stringy, seedy pulp to extract. I just sliced these babies into eights and stuck them on skewers.

The original way I prepared these was an Indian-spiced version from Cooking Light. I had actually meant to do that last night as well, but I had no fresh ginger. The ginger and other spices (whole coriander, ground cumin, etc) really give the squash some zip. Lacking the ginger, I decided to try a more Italian preparation (to go with our ravioli), coating the squash in fresh herbs, which allowed the flavor of the squash to shine on its own. The addition of some red onion adds a lovely pop of color and flavor to the skewer. A feast for the eyes as well as the palate!

Grilled Pattypan Squash Skewers

2 pattypan squash, cut into eighths
2 red onions, cut into eighths (I use the biggest pieces and reserve the small ones for other recipes)
1/4 tsp dried parsley
1/4 tsp dried basil
1/4 tsp dried thyme
1/8 tsp dried rosemary (you could certainly use fresh herbs instead)
salt and pepper
2 tsp olive oil


Combine the chopped vegetables in a bowl with the herbs, salt and pepper and oil. Toss to coat.


Thread the vegetables onto skewers (I try to alternate colors for greater visual impact).


Arrange the skewers on a preheated grill. Cook 12-15 minutes, rotating once or twice as necessary.

Sunday, August 21, 2011

Grilled Vegetable Salad


I'm back! I survived three weeks in London without cooking facilities (the prepared foods section of the local supermarket was my salvation) and am now back and raring to go in my own kitchen. The problem is that I'm still all discombobulated from being out of town and dealing with some family issues, so lately our meals have been patched together from whatever is on hand. Fortunately, it being mid-August, there's plenty on hand!

This recipe is a good way to tap into that bounty. I think grilled vegetables are hard to beat any day, but top them with this dressing and they become something else. And I love the flexibility of this recipe - just use whatever vegetables you have on hand. The dressing will meld them all together into a coherent dish.

I know, the picture doesn't look very impressive. I was starving and in a hurry (also, we didn't watch the grill closely enough so several items were overcooked). But trust me, this is worth a try. Maybe yours will come out looking prettier - either way, it tastes fantastic!


Grilled Vegetable Salad
 My recipe card says I got this from Proud Italian Cook, but I can't find the original recipe on her site. Either way, I've changed it up a bit.

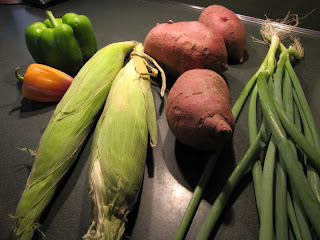
sweet potato, cut into 1/2" thick rounds (this time we used one very large, fat one - the middle one in the above picture)
corn on the cob, husked (we used two ears)
peppers, sliced into 1/2" rings(I used two bell peppers and half a cubanelle)
green onions, trimmed to a reasonable length for your grill
zucchini, sliced into 1/4" thick slabs
(*you could also use plenty of other veggies: I've done asparagus and green beans, and I'm tempted to throw some red onion rings in next time)

1 1/2 tbsp olive oil
1 tbsp red wine vinegar
1 1/2 tsp Dijon mustard
1 clove garlic
1 large stalk fresh oregano (I used Greek oregano)
14 tsp dried parsley (fresh is good, too, but I didn't feel like another trek out into the garden)
juice from half a lemon
salt and pepper

Fire up your grill! 

Toss your veggies with a little olive oil, salt and pepper (be gentle or your peppers will break like mine did - and you will probably need to rub the corn with oil separately, unless you have an enormous bowl). Spread the veggies on the grill and cook, turning once (they will each need different amounts of time, depending on their size and shape - just keep a better eye on them than we did!).


Meanwhile, prepare the dressing. Toss the garlic and herbs into a small food processor and mince. Add the rest of the ingredients and blend. (I prepared this by taste, so these measurements are approximate - I think the vinegar and mustard should be the strongest flavors, but do what tastes best to you).

Remove your vegetables from the grill. Cut the corn kernels off of the cob. Toss the vegetables together with the dressing in a large bowl and serve. (The recipe also suggests garnishing with fresh chives, but I forgot in my hurry to start eating!)