Wednesday, December 29, 2010

Roasted Cabbage


I don't know about you, but I'm in serious need of some vegetables. I used to be able to go all of Christmas week eating only (or mostly) carbs and sweets. I'm the kind of girl that eats cookies for breakfast when they're available. But in the past few years, when faced with a sugar-carb explosion, I find that my body starts craving something legitimately healthy. I guess I'm getting old.

While we started off last week with an obscene number of cookies in the house, it has been whittled down to a very reasonable level. And not just from us eating them - we managed to bring cookies places and leave them. The problem is twofold: there are a number of varieties of Christmas cookie that I dearly love, and love to bake so I want to do all of them. And new recipes get slipped in alongside old favorites without getting rid of any old favorites. So the number of batches tends to grow. Next year, though, I vow to be smarter and halve some of these recipes. That should keep things under control. Maybe.

So yesterday, after days of cookie overload, I decided we needed a bit more vegetation in our lives and roasted half a cabbage for dinner. This is a wonderful go-to recipe of mine. I found it last year when I was desperately searching for vegetables other than bell peppers and carrots that I might like to eat. I knew I'd eat cabbage in certain preparations, like stir fries and coleslaw without tasteable mayonnaise (did I mention I'm a picky eater?), so I thought I'd give it a shot. It is wonderful. I love the caramelization on the edges of the leaves. Roasting allows the cabbage's natural bite to mellow out a bit, similar to what happens to garlic when you roast it. The leaves are tender and delicate, and the lemon juice brightens it up. It's a winter side dish that feels like a light summer one. A worthy addition to anyone's winter menu.

Roasted Cabbage
Adapted from Martha Stewart Living via Meet Me in the Kitchen blog.


half of a small head of green cabbage (You could do the whole thing, but I find half is enough for us. I put the other half in a zip-lock bag in the fridge and it will keep for well over a week.)
2 tsp olive oil (or more, as needed to coat cabbage)
salt and pepper
2 tsp lemon juice

Preheat oven to 450°F. Cut cabbage into wedges - four per half of the head (try to keep some core on every piece - it's what holds the wedges together. Otherwise they'll fall apart when you move them). Brush them with olive oil and season.


Spread on a foil-lined baking sheet and place in the oven for 25-30 minutes, turning once halfway through (I used my small oven and they were done five minutes early, so be sure to check on them). Sprinkle lemon juice onto wedges and serve (I forgot the lemon juice last night - while they're great on their own, lemon juice does take them to another level).

Thursday, December 23, 2010

Biscotti


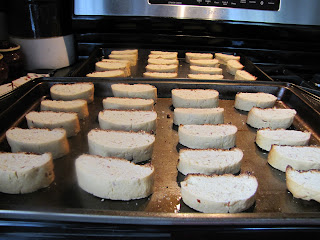
I've gone from Italian cookies to Polish cookies and back to Italian. Actually, I've gone a great deal farther than that. I've baked at least nine batches of cookies since last week, not to mention making poppy seed cake, which is a day-long venture in itself. I'm actually quite sick of baking. Sick enough that when I realized the bottoms of the biscotti burned, I decided to go with it, even though I'm giving them as a gift. Ninety percent of each cookie is fine. Isn't that good enough?

I make these biscotti a few times a year, always as a gift to my grandfather. Seriously - what is there to buy an eighty-five year old man? He likes the biscotti, so I continue to make them. I do vary the flavors a bit. The recipe says to use anise extract, which is pretty traditional in biscotti. I abhor anise, however, so I won't use it. I succumbed and did it once, but just the smell of it in my kitchen gave me a splitting headache. Since then, I tend to switch between vanilla and almond. I suppose hazelnut might be good as well - maybe I'll try adding some Frangelico next year . . . This time, as a twist (and to get them out of my cabinet) I tossed in some slivered almonds. I think they added a nice texture to the finished product.

These are easy enough to make (except don't overgrease the pans - I think that's how I burned the bottoms) and make a nice gift. I generally tuck them into a pretty tin and stick a bow on top. You may still have time to get a batch in as a last-minute gift!

Merry Christmas everyone!

Biscotti
I've been using this recipe for several years now. I don't remember where I got it.

1/2 c vegetable oil
3 eggs
1 c sugar
1 tbsp almond extract 
3 1/4 c flour
1 tbsp baking powder
1/2 c slivered almonds

Preheat oven to 375°F. Lightly grease a cookie sheet.

In a medium bowl, combine oil, eggs, sugar and almond extract. Whisk until well blended. In a larger bowl, combine flour, baking powder and almonds. Whisk well. Add the egg mixture and stir until a heavy dough forms.


 (I often find it is necessary to knead it a bit to fully blend everything together. There are lots of floury bits that try to stay at the bottom of the bowl and not blend with the rest. Kneading will get most of them.)


Divide the dough in half. Form each half into a roll about as long as your baking sheet (I did a really nice job of the rolling this time. I usually end up with awkward, ungainly logs, but this time they're pretty consistent-looking). Press the rolls down to about 1/2" thickness.


Bake 25-30 minutes (until golden brown - and not burned on the bottom!). Cool on a wire rack.

When cooled, take each roll and cut into 1/2" slices (mine were a bit bigger this time, but I think it is better to err on the side of large - smaller ones will tend to crumble more at the edges. On that note, I find it easier to slice them with a carving knife, rather than a serrated bread knife. Serrated knives tend to make the edges crumble).


Place the slices side-by-side on a baking sheet. Bake for about 5 minutes on each side (you might want to check them - try not to let them burn!) until lightly toasted. Cool and enjoy!

Tuesday, December 21, 2010

Polish Cookies


I want to post about these Polish Christmas cookies my family makes every year, but I'm having a hard time starting the post. You see, I don't know what to call them. My mom, brother and I always called them suhadki (which I haven't a clue how to spell, by the way - I've only ever heard and said it aloud). Grandma, however, (whose cookies these are) calls them suhadi (no 'k' sound). When asked how to spell it, she replied: sucharki. We've always just lived with that discrepancy in pronunciation. Interestingly, my dad's father, who is Italian, has always called them chrusciki, which is what they're called when you see them in the grocery store. While we've accepted our own idiosyncratic pronunciations, his has always been wrong.

So in order to solve this mystery, I went to the repository of all knowledge: the internet. When I googled 'sucharki,' I got this recipe for 'Polish Papal Wafers,' a traditional Easter cookie which looks like this. Our cookies look nothing like that. So I decided to google 'chrusciki' for comparison. Apparently, Grandpa was right - a thousand pictures of our cookies came up.

I'm not sure how this came about. It's possible that Grandma confused the names of two Polish cookies. Or even that her own mother did, since Grandma herself is not from Poland. Whatever the case, I don't think it's going to change my family's pronunciation. You can call them chrusciki. We're going to continue to call them whatever the heck we want.

Polish Christmas Cookies
My great-grandmother's recipe.

3 egg yolks
1/4 tsp salt
3 tbsp red wine (or whiskey, although we find we get better results with the wine)
~ 1 1/2 c flour (Grandma doesn't really measure flour . . . this is a guess based on this weekend's baking. I believe I was using a 1/2 c scoop and needed about three of those per three eggs, give or take a little)
powdered sugar, for topping

For this recipe, you'll need some sort of fryer filled with vegetable shortening. The shortening needs to be very hot to cook the dough properly. Best prepare this and let it heat before beginning the dough.

Mix the egg yolks, salt and wine in a bowl (Grandma advocates stirring with a fork. That's how we've always done it). Add flour until a dough forms. Knead well and continue to add flour until the dough is no longer sticky (the dough should feel a bit stiff).

Take about half the dough (yes, it is a very small amount, but you need to be able to roll it very thin - we find small amounts are easier to work with) and roll it out into a thin circle (I kept mine just thick enough that it wouldn't rip when picked up). With a pastry crimper, slice the dough into strips, cutting longer strips in half, and putting a small slash in the center of each one (like a buttonhole).


Pass the end of each strip through the slash and pull through gently in order to make a twisty knot (see the picture below - these cookies are shaped, but still raw). 


When the shortening is very hot, add cookies to the fryer (you can test the heat by adding a small bit of dough to the fryer - if it floats to the surface right away, the shortening is hot enough). The cookies will bubble and sizzle while frying. When they stop bubbling, they are done. When one side stops bubbling, flip them to cook the other side.


When they are cooked through, remove to a paper bag to drain. When they are dry, they can be put in a container (we use large tins now, but we used to use a cardboard box). They store well and last several weeks. Sprinkle with powdered sugar before serving.


Wednesday, December 15, 2010

Chocolate Pizzelles


I had meant to post this a few days ago, but the end of the semester got in the way. Now that grades are in and my office is no longer a cacophony of blue books and student folders, I can take care of my backlog of other business.

I decided to make pizzelles this past weekend while Jeff was home to entertain me (since it can be fairly time-consuming). Pizzelles are my favorite Christmas cookie. They are traditional Italian waffle cookies, made by pressing dough on a special iron, similar to a waffle maker (yes, sorry - this recipe requires special equipment!). My mom has been making them for as long as I can remember, and I have loved them for about that long. In fact, she tells a story about when I was little and "helped" put away the pizzelles once they had cooled. I was only allowed to eat the broken ones - the good, whole ones were for Christmas. So, crafty little one that I was, I started shoving the cookies into the tin so as to break them on purpose. Then I had lots of broken pieces to eat! I also lost my job as the helper . . .

My mom has had to make extra batches of the pizzelles every year just to make sure some got to the Christmas table, since I would invariably find the tin and polish off a significant number beforehand. But alas, no longer living at home I thought I had lost this opportunity. And Advent without pizzelles just doesn't seem right.

Until last year, that is. I was on line at the grocery store soon after Christmas, and realized that the woman in front of me had a Cuisinart pizzelle press in her cart. The clerk was having trouble ringing it up, so I generously offered to dash to the back and bring them the price label from the shelf . . . and grab one for myself! As soon as I got home, I called my mom to get her pizzelle recipe. Apparently, all these years she has used the recipe that came in the instruction manual! So that's what I did as well. I don't remember if I made some right away, but I definitely did them for the housewarming party Jeff and I had in March. I decided to try both the traditional vanilla and chocolate varieties.

Chocolate pizzelles are a bit of a chore because they stick to the press (at least, these do because they have actual chopped chocolate in them). When I did them in March, I tried spraying baking spray on the press for every few cookies. While this helped, it also made the cookies that absorbed the oil extra-brittle. They tasted different, too. So this time around I took a different approach. When I saw crumbs sticking to the press, I scrubbed them off with a vegetable brush (quickly, so the hot press wouldn't melt the brush!) and then wiped it down with a little vegetable oil on a paper towel. This was much more effective - I didn't have to do it as often and it didn't change the texture or flavor of the cookies.

Speaking of flavor, the chocolate pizzelles have an incredible one. I actually think the batter tastes better than the cookies (what? It gets on my fingers so I have to lick it off!). It's a deep rich chocolatey flavor, with little chocolate bits mixed in. As a crunchy cookie, much of the richness is absent - although it does leave a delicious chocolate aftertaste in your mouth. I think that if you let some of the cookie melt in your mouth, you might uncover the richness of the chocolate. But I can never make mine last that long!

Chocolate Pizzelles
Recipe from the Cuisinart Pizzelle Press instruction manual.

1 1/2 c flour
1/4 c cocoa powder
2 oz bittersweet chocolate, finely chopped (I used 60% Ghirardelli)
2 tsp baking powder
3 eggs
1 c sugar
1/2 c butter, melted
1 tbsp vanilla

Combine flour, cocoa powder, chocolate and baking powder in a bowl. Whisk well. Combine the eggs and sugar in a mixer. Mix for about 1 minute on medium speed (I only had my Kitchen Aid on 2 - when I turned it up to 4, things started splashing). Add butter in a slow stream - about 15 seconds - and then do the same with the vanilla (while you could do this with a hand mixer, it would make this step a bit tricky). Add the dry ingredients and mix 10-15 more seconds until just combined (you may need to do a little more - there can't be any clumps of flour or cocoa powder left, because they will not moisten during the cooking process).


Preheat your pizzelle press according to its instructions (mine beeps and a green light turns on when it gets to the proper temperature). Spoon 1 1/2 to 2 tsp dough onto each side of the press (mine came with a handy little plastic spoon to use). Drop the dough a little behind the center of each shape (since closing the lid will push it forward a bit).

Cook each pizzelle until it reaches the desired color. (I like mine in the pale to slightly golden range. How long this takes depends on your press - I think it's generally about a minute and a half. Mine has a light that goes from red to green when they're ready. My mom's didn't, so she had to guess. Be aware, though, that they will be floppy and flexible when they come out, and harden after a minute or so in the open air. If you want to form them into cannoli shells or waffle cones, this is the time.) Place each pizzelle on a paper bag to cool and harden . When hard, stack them in a decorative tin, or eat to your heart's content!


This recipe makes 36-40 cookies. They keep well for a long time - my mom says up to a year! - and seem to taste better with age, so they can be done several weeks or even months ahead.

Friday, December 10, 2010

Honey Chipotle Acorn Squash


Ideally, I'd like to post a new recipe every few days. But this only works when we a) are cooking and b) have time to take the pictures. There wasn't much cooking this past week, and the recipe we did for Monday dinner (shredded beef and cheddar flautas) ended up taking so long to cook that we threw something else together and had it on Tuesday. Since I was on campus Tuesday and not home until late, Jeff ended up finishing the recipe without me (I'm not complaining - that means that food was ready right when I got home!). We didn't end up cooking again until today.

This side dish was actually made on Monday to accompany the beef that refused to shred until 9:30 pm. Instead, it accompanied leftover stuffed shells. I had thought about blogging the recipe then, but with the haphazardness of our dinner, I decided to skip it.

This was a fortunate decision, for now you all get to benefit from my busy-ness. You see, the chipotle was a little intense. I mean eye-tearing, tastebud-scalding intense. I took the slender wedge of squash in my hand and ate it like a slice of watermelon. Unfortunately, that puts the full intensity of the chipotle right on the tongue. Bad idea. It's hard to compel your tastebuds to operate again after that sort of shock. I'm pretty sure Jeff would agree - we were both running for the milk after that side dish.

Yet we still thought it was worth a second shot. We agreed that some additional sweetness would help mitigate some of the intensity of the chipotle. Tonight we tried again - this time, with some honey (although I think maple syrup might be nice as well).

The result? Much better than the first time (well, also because we've learned not to put the chipotle right on the tongue). I did not need the milk at all. The chipotle still has quite a kick, but the sweetness of the honey adds another dimension, so it's not all kick. When looking through variations of this recipe online, I saw one comment that said the sweetness of the acorn squash goes well with the spiciness of the chipotle. I don't actually think acorn squash is very sweet. Nothing like a butternut, or, dare I suggest, buttercup (which I actually found too sweet for my taste, and I have a big sweet tooth!). If you do think acorn is sweet enough, you may want to reduce or eliminate the honey. I do agree, though, that the spiciness works well with the squash. If you're looking for an alternative to maple-glazed squash (which seems to be the standard preparation), I think this is a pretty solid option.

Honey Chipotle Acorn Squash
Adapted from Joelen's Culinary Adventures.

1 acorn squash
1 tbsp olive oil (I use light for cooking)
1 garlic clove, minced
1/2 tsp ground chipotle chile
1/2 tsp salt
1/2 tsp black pepper
1 tsp honey

Preheat oven to 400°F.

Cut the stem off the acorn squash, then slice in half lengthwise. Scoop the seeds and stringy pulp out with a spoon. Slice each half into 3/4" wedges and transfer to a rimmed baking sheet.


Combine olive oil, garlic, ground chipotle, salt, pepper and honey in a bowl. Whisk to blend (if the mixture is too viscous, as mine was, you might want to add a bit more oil to loosen it up). Pour over the squash and toss to coat (you may want to do this step in a bowl - my baking pan had high sides, so I was able to use it effectively).

Roast squash for about 20 minutes, until tender. Serve.

Sunday, December 5, 2010

Chocolate-Covered Strawberries


Sometimes I think I'm the most brilliant person I know. I guess that's because I get to experience all of my own brilliant ideas, and only some of other people's.

I was sitting around this afternoon, watching the Giants crush the Redskins. It was too early to start dinner, but I wanted some kitchen action. I thought about the half-box of strawberries in the fridge. I thought about the chocolate in the cabinet. And then I put them together.

Y. U. M. As we were throwing this baby together, Jeff asked, "Why don't other people do this? All the time?" I was thinking the exact same thing (although I did not join him in some of his other thoughts, like "We should cover our chicken in chocolate!" and "Ghirardelli is my favorite deli"). Melting chocolate is not hard. Dipping strawberries in it is not hard. Who needs a special occasion for something you can throw together in 20 minutes on a Sunday afternoon?

My guess is that people are thrown off by scary terms like "double boiler." I believe they sell double boilers, but it seems like a waste of money to me. All you need is a bowl that fits over your pot. You boil water in the pot, turn off the heat, and put the bowl of whatever you're trying to melt over it. Stir it as it melts. Done. This is not rocket science. The hardest part is waiting for the water to boil while you contemplate the deliciousness you are about to create.

In case you doubt how easy this actually is, let me point out that this was my first time doing it. (Ok, so it's not my first time using a double boiler. I've made recipes involving melted chocolate before. I've just never coated anything in it.) And it was Jeff's first time using a double boiler and he did just fine. In fact, he melted the white chocolate himself while I was dipping strawberries.

The only hiccup in the whole process was that we used a little too much chocolate. After we'd finished dipping and drizzling the strawberries, we started scrambling around for other things to dip. I tried a chocolate peanut butter cookie, but it was a bit too crumbly to put up with that sort of handling. Pretzels, graham crackers or shortbread cookies would work nicely, but we didn't have any of those. We ended up tossing in some clementine wedges . . . and our fingers . . . to finish it off. Which wasn't a bad option either.


So do this. Soon. You owe it to yourself.


Chocolate-Covered Strawberries
Guided by Food Network.

3 oz bittersweet chocolate, chopped roughly into small chunks
1 1/2 oz white chocolate, chopped roughly into small chunks
half a box of strawberries (about 9 oz), washed and dried well


Find two small pots and two heatproof (as in, won't melt or be otherwise damaged by the heat) bowls that fit over the tops without falling in. Now you have two double-boilers. (Alternatively, you could use one pot and two bowls, but this will take longer.)

Add a few inches of water to each pot and bring them to a simmer. Put the chocolates into separate heatproof bowls. When the water is simmering, turn off the heat. Place a bowl over the top and stir the chocolate until it melts. Repeat with the other bowl (I staggered them a bit so I didn't have to stir two bowls at once). Bring your melted chocolate over to the counter.

Holding the leaves of the strawberries (or stems - mine had no stems, though), twirl them gently in the bittersweet chocolate (or whichever chocolate you wish - this recipe is designed to cover them in dark chocolate with a white chocolate drizzle, but any combination works) until covered. Then place each one on a parchment-lined baking sheet to dry.


When all the strawberries are coated, use a fork to drizzle white chocolate over them as decoration (hopefully you can do a prettier job than we did - but ugly drizzle won't affect the deliciousness of the final product!). Set the tray aside to harden for about 30 minutes. Enjoy!

Thursday, December 2, 2010

Chocolate Peanut Butter Cookies


Jeff's sister went to the chocolate show in New York a few weeks ago and brought him back some treats for his birthday. Among them was this jar of chocolate peanut butter.


I thought this would be perfect for chocolate peanut butter cookies. And I even had an occasion - Jeff gave a big talk last night that was filmed for DVD. He rose to the occasion - a performance clearly deserving of a chocolatey, peanut buttery reward!

I also took the opportunity to do some experimenting. I got an awesome new oven back in August, but I had yet to try the convection function. I thought cookies would be a good way to test this out. I could try the first batch and, if it didn't work for some reason, I'd still have another batch I could do the regular way. As it turned out, everything went well. My oven manual says that the timer would beep when the time is 75% up (since things may cook faster in a convection oven), but I'm pretty sure that didn't happen. Still, they came out beautifully.

While I think the cookies were good, I'm not a huge fan of the chocolate peanut butter. I felt that, rather than complementing one another, the two flavors almost cancelled each other out. I can taste the peanut butter, but it seems weaker than it should be. I don't think I can taste the chocolate at all (well, maybe in the aftertaste). Overall, I think it produces a pretty ordinary cookie (rather than the kick-ass one I was expecting). But I'm being critical because it's my job. Based on the number of cookies Jeff took last night, I'm pretty sure he was pleased with them.

Chocolate Peanut Butter Cookies
Adapted from Southern Living's Southern Barbecue Cookbook (source of all my favorite cookie recipes).

1 c butter, softened
1 c chocolate peanut butter (of course, you could use any kind of peanut butter you have on hand)
1 c sugar + some extra for topping
1 c brown sugar (I used light brown because I didn't want it to conflict with the flavors in the cookie)
2 eggs
2 1/2 c flour
2 tsp baking soda
1/4 tsp salt
1 tsp vanilla

Using a stand mixer on medium speed, beat butter and peanut butter together until creamy (you could, of course, do this with a hand mixer as well. I think, though, that the cookies turn out the best when the butter is creamed on its own before the sugar is added). Gradually add sugars and cream together. Then slowly add eggs and vanilla (I like to do this on a slightly lower speed, so as not to whip the eggs). In a separate bowl, whisk together the flour, baking soda and salt. Add this gradually to the butter mixture. Cover and chill for about 3 hours.


When chilled, preheat oven to 375°. Shape the dough into 1/2" balls. Dip a fork in sugar and press the balls flat, making a criss-cross pattern on top (this is the international symbol for peanut butter cookies).


Bake 7-8 minutes (the middles may be slightly less than set, but this is good - it will allow the cookies to stay moist and chewy rather than crispy). This recipe makes about 6 dozen (although that depends on how big you make them - I made slightly less because I make big cookies . . . and eat some cookie dough in the process!).