Sunday, December 23, 2012

Classic Pizzelles


It's not Christmas without some pizzelles! I shared my chocolate pizzelle recipe with you a few years ago. This year, I thought it was time to share the real deal. I've made several pizzelle flavors over the years - vanilla, chocolate, chocolate hazelnut, pumpkin - but vanilla is always my favorite.

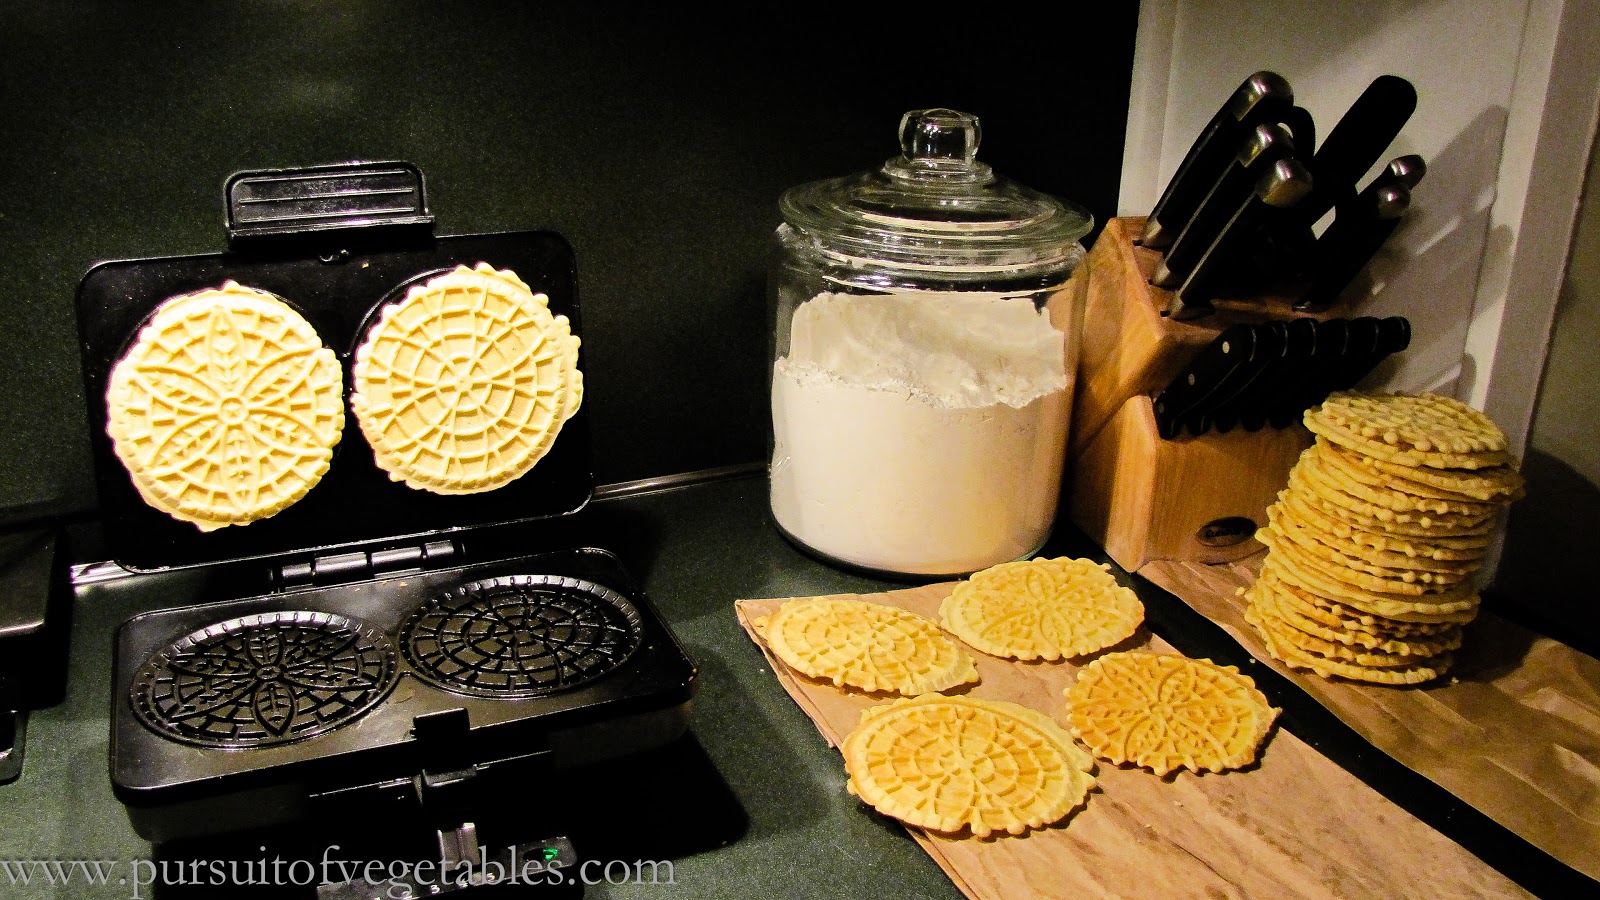
My mom has always limited pizzelle-making to the holidays because it can be a time-consuming process. Most presses only make two cookies at a time - the number that I used to eat as a kid would keep my mom busy for hours. I don't mind taking the time as much, since they're my favorite cookies, but I've still been saving them for special occasions. But now that we have a TV in our kitchen (merry Christmas to us!), pizzelle-making is no longer a chore. I can sit in the kitchen, monitoring the press and watching a good movie. It was seriously easy. I may be making these far more often in the future - especially since they store so well!

Classic Pizzelles

1 3/4 c flour
2 tsp baking powder
3 eggs
3/4 c sugar
1/2 c butter, melted and cooled
1 tbsp vanilla

First, set up your work station. You'll need an electric mixer for the batter, a hot pizzelle press, and a paper bag or some paper towels for the pizzelles to cool on. (Why not a cooling rack? This is the way my mom always did it. But I think the paper bags help draw the moisture out of the cookies as they finish cooking, creating a crispier result.)

Whisk together the flour and baking powder in a small bowl. Combine the eggs and sugar in the mixer bowl. Mix on medium speed for about a minute. Add the butter in a slow stream, then repeat for the vanilla. Add the dry ingredients and mix for another 20 seconds or so, until everything is moistened. The batter will be thick.


Drop the batter onto the pizzelle press in teaspoon-sized portions (my press came with a special little plastic spoon for this). Make sure you center each dollop on the pattern (I also find that positioning it slightly to the back of the press works well, since the batter is squeezed forward as the press closes). Close the press and cook 1-2 minutes until slightly golden, or until the press tells you they're done (mine has a convenient green light that goes off).


When the cookies are ready, gently peel them off (it shouldn't be too difficult - the vanilla ones are the easiest to work with of any pizzelles I've made) and place them on the paper bag or towel to harden (I stack them when they're cool to conserve space). Repeat with the rest of the batter (you'll probably want to find a good TV show to watch). These can be stored in a box or tin for several weeks - avoid air-tight containers, which might make them soggy.


Friday, December 21, 2012

Fudge-Dipped Cherry Shortbread Sandwich Cookies


I've been wanting to make these cookies for years. They've made it on my Christmas to-do list before, but somehow they never happen. I guess I thought they would be really time-consuming, what with the shortbread, the filling and the fudge dipping sauce. As it turns out, however, there is not much hands-on time at all. The recipe is extremely easy to throw together in little stages. The shortbread is tasty, the cream is awesome, and the fudge sauce is luscious.

The one problem I have with this cookie is the fudge sauce. It tastes delicious, but it's not very practical. It remains soft and drippy even after a night in the freezer. I placed some cookies on a plate for a few minutes in order to take the above picture, and they'd already left chocolate smears all over it. In the future, I think I'll dispense with the fudge sauce (who wants to eat corn syrup anyway?) and go for a hard chocolate coating, like what you would use on a truffle. I'm still including the fudge recipe here, but I'll update it when I come up with a better solution.

Fudge-Dipped Cherry Shortbread Sandwich Cookies
From Better Homes and Gardens November 2009.

Shortbread:
1/2 c dried cherries
1 1/2 c flour
1/2 c sugar
2 tbsp cornstarch
1/2 tsp salt
1/4 tsp baking powder
3/4 c butter, cold and cut into 1/2" pieces

Fudge:
1/2 c heavy cream
3 tbsp light corn syrup (I did find an organic, GMO-free one!)
4 oz semisweet chocolate chips

Cream:
1/2 c heavy cream
3 oz cream cheese, softened
1/4 c powdered sugar
1/2 tsp vanilla extract

Preheat oven to 325° F. Add the cherries to a small bowl and cover with boiling water. Let sit ten minutes, then drain.

In a food processor, combine flour, sugar, cornstarch, salt and baking powder. Pulse until combined. Add the butter and soaked cherries and pulse until the dough begins to clump together. Dump out onto a sheet of parchment paper. Mold the dough into a square, cover with another sheet of parchment paper, and roll into a 12 x 9" rectangle (I don't know how you roll things into rectangles - mine was more oval, so I sliced the edges off and rolled them out separately. That's what caused the different-sized rectangles in the picture below). Remove the top parchment and use a knife to slice the dough into 3 x 1" pieces (but don't separate them!). Slide the parchment onto a baking sheet.


Bake the shortbread for 30-35 minutes, until lightly golden. Remove and cool completely on a wire rack. Then use a knife to separate the rectangles and match them into evenly-sized pairs.

Meanwhile, make the fudge sauce. In a small saucepan, combine the cream and corn syrup. Cook over medium-high heat until hot. Remove from heat and add the chocolate chips, stirring with a spatula until the chocolate is melted and combined. Let cool for about an hour, until thickened.


To make the cream filling, combine the cream, cream cheese, sugar and vanilla in a medium bowl. Beat with an electric mixer until stiff peaks form. Refrigerate until ready to use.

When everything is ready, assemble the cookies. Pick up a pair of shortbreads. Use a small spatula to spread the cream onto the flat side of one cookie. Top with the other cookie, flat side down. Dip one end into fudge sauce, then place on a piece of parchment paper to dry (since I was making these a week or so in advance, I put the parchment on a baking sheet which I could slip in the freezer. Once frozen, I removed them to tupperware containers). Repeat with the rest of the cookies.


Wednesday, December 19, 2012

Cranberry-Pecan Oatmeal Cookies


It's cookie-making time! I started the week with an intimidating list of Christmas cooking and baking projects. So far, though, everything is going swimmingly. Most of my cookie baking is complete, both for desserts and edible gifts, and what's left is definitely do-able in the time I have available.

I look forward to holidays and family gatherings as a time to bake some of the new, fun recipes that I've been stockpiling. However, this seems to please me more than everybody else. When it comes to gifting, I fall back on the old standards that my family always asks for. These oatmeal cookies are one of my specialties. This batch is for my Grandma - she insists that I shouldn't buy her any presents and that she doesn't need anything, but these cookies always bring a smile to her face.

These cookies are just as good for gifting as they are for munching on a weekday afternoon. It's a great all-purpose recipe to have around. I think Santa would appreciate it if you left some out for him, too!

Cranberry-Pecan Oatmeal Cookies
Adapted from Southern Living Best of Barbecue cookbook.

1 c butter, softened
1 c sugar
1 c brown sugar
2 eggs
1 tbsp vanilla extract
2 c flour
1 tsp baking soda
1/2 tsp baking powder
1/2 tsp salt
1 1/2 c rolled oats
1 c dried cranberries
1 c chopped pecans

Preheat oven to 375° F. 

In a stand mixer, beat the butter until creamy, then add the sugars. 


Add the eggs and vanilla and mix until combined. In a separate bowl, whisk together the flour, baking soda, baking powder and salt. Gradually add this to the butter mixture until everything is well moistened. Stir in oats, raisins and pecans. Drop in teaspoon-sized pieces (mine are probably a bit larger) onto greased baking sheets. Bake 8-10 minutes, until lightly browned.


Cool on a wire rack. These can also be frozen if you want to make them ahead of time.


Tuesday, December 11, 2012

Farro Risotto with Winter Squash, Hazelnuts and Gruyere


I know my last post was about how busy we are and how great quick recipes are at this time of year. That's still true. But I threw this complicated recipe on my menu (on a weeknight, no less!) because I just couldn't resist it any more. The fact that I had most of the ingredients on hand already sealed the deal. I spent a Monday evening laboriously chopping the hardest winter squash in the world (seriously - I don't usually have much trouble with them but this one was a doozy), then standing over the stove stirring and stirring.

Yes, it took up time I should have been spending on work. Yes, all that standing aggravated my injured foot. Yes, I nearly chopped several fingers off working on that squash. But you know what? Once we sat down to eat it was totally worth it. This was a bowl of creamy, complex, earthy deliciousness. So earthy, in fact, that Jeff couldn't believe there were no mushrooms. The squash was sweet, the hazelnuts crunchy and earthy, and the Gruyere added a nice bite. I don't think you could improve this dish. We got six servings out of this - three meals - and it got better with each one. This is not only a keeper, but it's worth some more of my precious pre-holiday time.

Farro Risotto with Winter Squash, Hazelnuts and Gruyere
From Cooking Light January/February 2012.

1 tbsp olive oil
1 large leek, white and light green parts sliced and cleaned
1 c uncooked farro
1 clove garlic, minced
1/2 c white wine
4 c water, divided
4 c cubed winter squash (the recipe calls for butternut, but I used a Golden Nugget that I had sitting around)
1 tbsp fresh sage, chopped
3/4 tsp kosher salt
1/2 tsp black pepper
2 oz Gruyere, shredded
1/2 c hazelnuts

Heat the oil in a large Dutch oven over medium heat. Add the leek and cook 5 minutes, until translucent and tender. Add garlic and cook 30 seconds, until fragrant. Add the uncooked farro and cook another minute, stirring constantly.


Stir in the wine and cook 2-3 minutes, until it evaporates. Add 1 c water and cook 8 minutes, stirring frequently, until nearly all the liquid is absorbed. Repeat for next 2 c water.


Stir in remaining 1 c water, squash, sage, salt and pepper. Cover, reduce heat and simmer 30 minutes, until squash is tender. Meanwhile, heat a small pan over medium-high heat. Add the hazelnuts and toast, shaking frequently, until golden. Remove from heat and transfer to a bowl.

When the risotto is done simmering, stir in the cheese and most of the nuts, reserving some to use as  a garnish. Serve hot.


Sunday, December 9, 2012

Cauliflower, Kale and White Bean Soup


With the holidays so near, everything is starting to get busy. Between our normal activities, trips to the gym, and holiday baking and other preparations, we seem to be occupied every evening. This is not the time for complicated, time-consuming recipes (though I still love them, and have a good one to post some time soon!). This is the time for simple goodness simmering in a pot.

This soup is really easy to throw together, using some of my favorite winter vegetables. I can never get enough cauliflower. It's good in soup, roasted, pureed in pasta sauce, in curries, and sometimes even raw. Roasted cauliflower, in particular, doesn't last very long in our house. Leftovers are a rare occurrence. This soup didn't last long, either, since it combined the wonder of cauliflower with delicious, nutritious kale. I don't know about you guys, but when I eat kale, I feel so much more energetic and alert. Those vitamins must be doing something good!

What made our batch of soup extra special is that we made it with some of our Thanksgiving turkey stock. That stock turned out so thick and rich that it gelled in the fridge. There was definitely some extra protein floating around in there. If you have homemade poultry stock, it will make this soup more delicious. If you don't, it'll still turn out pretty good, and good for you!

Cauliflower, Kale and White Bean Soup
Adapted from What Would Cathy Eat?

2 tbsp olive oil
3 leeks, white and light green parts sliced and soaked
3 cloves garlic, chopped
1/2 tsp red pepper flakes
4 c kale, chopped
2-3 c cannellini beans, cooked
1 small head cauliflower, broken into bite-sized florets
6 c turkey stock
2 c water
1 bay leaf
1 tbsp dried parsley (fresh would be better, if you have it)
salt and black pepper to taste (my stock is unsalted, so I had to add a lot of salt to the soup)
4 tbsp grated Parmesan

In a large Dutch oven, heat the olive oil over medium heat. Add the leeks and cook about 10 minutes, until softened. Add garlic and red pepper flakes and cook about 1 minute, until fragrant. Add kale and cook for 5 more minutes.


Add the beans, cauliflower, stock, water, bay leaf, parsley, salt and pepper. Bring to a boil, then reduce heat and simmer for 12-15 minutes, until the cauliflower is very tender. Stir in Parmesan and serve. (Remember to remove your bay leaf!)


Tuesday, December 4, 2012

Cabbage and Leek Gratin with Mustard Cream


We're in full-fledged Christmas mode around here. I wanted to get all the decorations up this week, but I couldn't bear to decorate a dirty house. We've been skimping on the cleaning for a while now - a deep clean is overdue. My solution has been taking the house one room at a time, cleaning really well, then decorating as we go. So far we've tackled . . . three rooms. One of them was the kitchen, though, so I consider it a triumph. The Christmas tree just went up and will be decorated later tonight, so we'll have to handle the rest of the rooms later in the week. However long it takes, I am determined to have everything sparkling before Christmas.

A clean, festive house requires comfort food, doesn't it? But if you're anything like me, you're probably trying to avoid too much heavy winter fare. There will be enough time for splurging and treats at all the holiday parties that are coming up - in between, we need to keep things light. This is a great meal for that. Despite its name, this gratin is cheese-less. I've lightened up the dairy called for in the original recipe, so the final result is a healthy but satisfying dinner option.

Cabbage and Leek Gratin with Mustard Cream
Adapted from Deborah Madison's Vegetarian Suppers.

1 1/2 lb green cabbage, chopped into bite-sized chunks
3 large leeks, sliced into half-moons
1/3 c flour
1 c skim milk
1/3 c fat free Greek yogurt
3 eggs
3 tbsp dill, chopped
1 small shallot, minced
1 1/2 tsp white wine vinegar
2/3 c fat free Greek yogurt
1 tbsp Dijon mustard
1/2 tsp prepared horseradish
salt

Preheat oven to 350° F and lightly coat a 6 c gratin dish with cooking spray.

Bring a large pot of salted water to a boil. Add cabbage and leeks. Boil for 5 minutes, drain in a colander and press out remaining water. Return the cabbage mixture to the empty pot.


Whisk together flour, milk, yogurt, eggs and herbs, then add to the cabbage and leek mixture. Sprinkle with 3/4 tsp salt and fold together with a rubber spatula.


Transfer to prepared dish and bake 45 minutes, until firm and browned.


Meanwhile, mix the shallot and vinegar in a small bowl with 1/8 tsp salt and let stand for 5 minutes. Add yogurt, mustard and horseradish. Mix well to combine, then serve with gratin.


(If any of you end up trying the mustard cream, let me know what you think! I think it tastes exactly like the sauce Burger King uses on the Whopper. Who would have thought that pickled shallots were the secret ingredient?)

Tuesday, November 20, 2012

Roasted Sweet Pototoes, Carrots and Turnips


The recipe that I use the most in my kitchen is not a recipe at all. It's more of a formula: chop vegetables, toss with oil and herbs and roast until tender and slightly caramelized. A wide variety of vegetables can be thrown into the mix: winter squashes and potatoes, carrots and onions, turnips and garlic. The herbs vary as well: rosemary, thyme, sage, parsley, basil. The mixture depends on my mood, the contents of my pantry, and the accompanying dishes. Roasting is easy, always satisfying, and always at my fingertips for a last-minute dish.

This particular combination is a real winner. The addition of some tiny hakurei turnips to my planned dish of carrots and sweet potatoes provided variety in color and texture, as well as adding a little  zing. The carrots remained firm and lightly sweet through the roasting process, while the sweet potatoes became soft and dissolved into an almost candy-like sweetness. Throw them all together and you have seriously good eats - something appropriate for a Thanksgiving table as well as a Monday night dinner.


Roasted Sweet Potatoes, Carrots and Turnips

1 1/2 lb sweet potato, cut into 1" chunks (you don't need to peel them - the best nutrition will come off with the skin - but my sweet potato looked a little mangy, so I did this time)
1 lb carrot, cut into 1" chunks
1/2 lb turnip, cut into 1" chunks (I used several small ones, but a large turnip or rutabaga would be fine as well)
1 tsp dried thyme (fresh would be better - I didn't feel like stumbling around my herb garden with a flashlight to find some!)
1/2 tsp dried winter savory
salt and pepper to taste
2 tbsp olive oil

Preheat oven to 400° F.

Combine the sweet potatoes, carrots and turnips in a large bowl. Sprinkle with herbs, salt and pepper, drizzle with olive oil, and mix to combine (I prefer to toss the mixture with my hands). Transfer to a foil-lined baking sheet.

Roast for 30-40 minutes, depending on your oven (my batch took 35), stirring once or twice to keep the vegetables from sticking to the foil. Serve hot!


Thursday, November 15, 2012

Braided Pesto Bread


I find myself making a lot of yeast bread lately. Now that I've gotten a feel for things (and don't end up with scary yeast monsters anymore), bread-making is a snap.

This bread has quickly become one of  my favorites. It's soft and delicious on its own and the filling adds an amazing touch. I want to experiment with other sorts of fillings (tomato paste? mozzarella and pepperoni? did I just blow your mind?), but so far I keep coming back to the pesto. It's salty and cheesey and basily - exactly what this fluffy bread calls for - and the green looks so pretty leaking out of the dough. My only problem is with the Parmesan cheese sprinkled on top - absolutely necessary in my opinion, but it has the unfortunate habit of burning really quickly if not watched. Don't worry - it's not a deal-breaker. Burned cheese or no, you'll be all over this bread.

I'm not sure I can look at pictures of this bread any longer. I might need to go make some now. Good thing I have so much frozen pesto!

Braided Pesto Bread
Slightly adapted from Confections of a Foodie Bride.

1 c warm water (105-115° F)
2 tsp active dry yeast
2 1/2 c flour plus some for dusting
1 tbsp olive oil
1 tsp salt
1/2-3/4 c pesto (the original recipe called for 1/2 c of a very liquidy pesto - since my homemade pesto is more pastey, I needed to add more)
2 tbsp grated Parmesan

Measure warm water into a bowl, sprinkle on yeast and let sit ten minutes until frothy (a tiny pinch of sugar can be added to help the yeast get going). Transfer to the bowl of a stand mixer, add flour, oil and salt and mix on low with the dough hook attachment until well blended.

Increase speed to medium and knead with dough hook for five minutes, until smooth and elastic. Remove the dough to a floured counter top and knead by hand, adding a little flour if necessary, until smooth and unsticky (the dough should be a bit tacky, but not stick mercilessly to everything it touches). Form the dough into a ball and transfer into a bowl coated in cooking spray. Put in a warm, undrafty place and let rise until doubled, 45 minutes to an hour.


When the dough is doubled, flour your counter top again and pat and roll your dough into a rectangle, about 18x12 inches. Spread the pesto over the top of the dough, leaving a clean 1/2" border (ok, so mine's closer to an inch - even with my ruler, I can't measure).


Carefully roll the long side of the dough toward you, making sure your roll is tight and the end remains pinched closed. Once the dough is totally rolled, pinch the seam closed (if your ends are too floury to be properly pinched, pinch from a bit further back, where the dough is stickier).


Transfer your roll to a parchment-lined baking sheet. (You could do this after you've formed the ring, but it may be difficult to transfer to the baking sheet - perhaps doing it on the counter with a sheet of parchment under it would solve both problems, but I haven't tried it yet. Next time.) Carefully slice the dough in half lengthwise (my enterprising husband discovered that a dough scraper works far better than a knife for this job).


Quickly and carefully, pinch the top ends of the dough halves back together and twist them into a braid, trying to keep the cut ends facing up (so they look pretty and don't spill out pesto in the oven). Twist your braid into a ring and pinch the ends together. (If your ring looks kinda funky - fat in some places and thin in others - take some time to plump and poke at it to make it into a prettier shape.) Set it aside to rest and rise for another 30 minutes. Meanwhile, preheat your oven to 425° F.


When the ring has risen, bake for about 22 minutes. Remove from the oven, sprinkle the top with Parmesan cheese, then return for another 2-3 minutes until melty and golden. Let cool for at least 10 minutes before serving.


Tuesday, November 13, 2012

Sweet Curry Carrots with Yogurt Sauce


I was invited by Cathy Elton of What Would Cathy Eat? to participate in her Healthy Thanksgiving Challenge. I first found Cathy's blog earlier in the year, after I'd been diagnosed with high cholesterol and was frantically looking for heart-healthy recipes. There are some totally delicious recipes on her blog - I definitely recommend checking it out. I may even be making her Caramelized Onion Tart with Greens and Cashew Cream to bring to my in-laws for Thanksgiving!


As my family has learned over the past several years, dealing with my dad's heart condition (and now my cholesterol), making a fantastic, healthy holiday meal isn't as difficult as it sounds. Of course you should treat yourself - no Thanksgiving table is complete without pie - but you don't have to make every dish a special (read: diet-busting) treat.

Fall vegetables should be at the center of every holiday meal. Sweet potatoes, winter squash, cauliflower, kale and Brussels sprouts are some of my favorite things and all quite delicious without much adornment. Naturally, I had a very difficult time deciding what to make for this challenge. How could I choose? What ultimately happened was my CSA chose for me. Last Friday, part of my last farm share of the season was a bunch of gorgeous baby carrots - adorable, delicious and photogenic. This was the inspiration I was looking for. They brought to mind this recipe I'd pulled out of Better Homes and Gardens back in April. While this recipe was meant to grace an Easter table, it will do just as well for Thanksgiving.

The carrots are soft and delicious, the honey-curry glaze sweet and savory all at once, and the yogurt sauce adds a creamy finish. Jeff and I sat down and nearly finished off the platter by ourselves (of course, they'll go farther at a Thanksgiving table with several other side dishes - the original recipe claims it serves 8-10). I just hope I can get my hands on some more of these sweet babies to make for my own Thanksgiving dinner!

Sweet Curry Carrots with Yogurt Sauce
Better Homes and Gardens April 2012

1-1 1/2 lbs baby carrots (the tops should be trimmed down but still on)
1 tbsp olive oil
1/2 tsp salt, divided
3 tbsp honey
1 tbsp curry powder (a heaping tablespoon, if you know what's good for you!)
2/3 c plain fat free Greek yogurt
1/4 c thinly sliced green onions (darker green ends only - reserve the white parts for something else)

Preheat oven to 425° F. Line a baking sheet with aluminum foil. Spread the carrots on the baking sheet, drizzle with oil and sprinkle with 1/4 tsp salt. Roll the carrots around with your hands to coat them in oil. Roast for 15 minutes.


Meanwhile, put the honey in a microwaveable bowl and heat for about 30 seconds, until nice and runny. Whisk in the curry powder. When the carrots are done, remove the tray from the oven and drizzle with the honey. Roll the carrots around in it to coat. Return to the oven for 10 minutes, until all the carrots are tender.


While the carrots finish roasting, combine the yogurt, green onions and remaining 1/4 tsp salt in a bowl. Serve alongside carrots for dipping.

Saturday, November 3, 2012

Superstorm Sandy Recap


We survived Superstorm Sandy (or hurricane or Frankenstorm or Nor'easticane - whatever you want to call her). Three days without power, heat, landline or internet. As temperatures dropped, we holed up in our bedroom with the dog every night, trying to conserve heat and do bedtime reading by candlelight. The house dropped to 53 degrees on the last day, which is far too cold for me. How do people survive power outages in the actual winter?

Everything wasn't terrible, though. Jeff and I agree that we ate like kings all week. Our gas stove worked, although it was difficult to truly cook by candlelight. We learned to do most of our cooking, or at least the prep work, during daylight hours. Washing dishes, too - I normally feel like we're constantly washing dishes in this house, but that's nothing compared to when the dishwasher isn't operating. And that had to be done during daylight as well (please, don't try to wash sharp knives in the dark).

I already had a meal plan in place for the week and only the sequence needed to be altered to fit our new unplugged lifestyle. On Monday, during the storm, we ate delicious sausage, kale and white bean saute from Simply Recipes alongside my favorite Indian-spiced cauliflower and tomatoes. We finished cleaning up just before the power went out that night. On Tuesday we ate the leftovers for dinner. For breakfast and lunch, we began clearing the fridge - Cherry Grove Farm's Chili Jack cheese went into omelets and later grilled cheese sandwiches. On Wednesday we made a giant fried rice that served for lunch and dinner, with a pile of vegetables from our crisper - bok choy, kohlrabi, carrots, a leek and some other odds and ends (that's what you can see in the above picture). We also grilled some chicken pieces that came out of our freezer (most of its contents had been sent to a neighbor's house that morning, but some things were too warm already) and tossed some on top.Thursday saw an awesome breakfast/lunch hash featuring sausage, spinach, some scrambled eggs, red onion, white beans and Parmesan cheese. For dinner, we finally made the amazing tortellini soup with chard and white beans from Annie's Eats that had been planned for earlier in the week. I'd been putting that one off because it made too many servings and I didn't know how well they'd keep overnight. But it turns out that I planned things perfectly, because the power came back later that night and the soup was saved through the magic of refrigeration.

This was the first time in my life I'd ever had to deal with a sustained power outage. It was a stressful experience, though not as terrible as it could have been (let that never happen to us in the winter, please!). Next time such a storm comes through, I won't do my regular grocery shopping mere days before (and buy extra cheese - what was I thinking?), but will stick to less perishable items. Still, despite my inexperience, we didn't lose much, and nothing we really cared about (like the freezer full of produce we'd been laboring over for two months).

I am glad we've recovered and things are pretty much back to normal. My heart goes out to those who had, and are still having, a much harder time, particularly all those who lost their homes in this catastrophe. Let's just hope the Nor'easter projected for next week decides to miss us - we've had enough weather drama for a while!

Monday, October 29, 2012

Vegan Chocolate Cake with Un-Vegan Peanut Butter Glaze


What to do when a hurricane is raging outside? Cook! At least, that's what I chose this morning. To be fair, we were driving up and down I-95 all weekend, so some of these are weekend projects we never got to - I wouldn't normally plan to do all this during a storm. Still, it was a great way to use my time earlier this morning when the storm wasn't so intense. Now I have a new batch of vegetable stock (soup tomorrow), a batch of white beans (dinner today), a loaf of whole wheat bread, another of banana bread, and a batch of granola. I also cleaned and prepped most of the greens that are in my fridge. We're definitely prepared to spend several days holed up at home.

I did not make this recipe today, but I easily could have. It's a wonderful quick cake using ingredients you probably have on hand already. Jeff and I first made the cake a few weeks ago when, half an hour before Monday night football, we decided we wanted dessert. It came together and went into the oven before the game and was ready to eat by halftime. We made it again for a Halloween party on Friday, this time with a peanut butter glaze to give it a little orange-and-black Halloween spirit. Again, the cake was ready in under an hour, and the glaze took seconds to whisk together. If you're looking for a nice dessert to throw together with little mess and no fuss, whether before a football game or in the middle of a hurricane, this is it!

Note: while the cake is vegan, the glaze does have a little milk. You could easily sub in soy milk or almond milk to make it vegan as well.

Vegan Chocolate Cake with Un-Vegan Peanut Butter Glaze
Cake is barely adapted from Joy the Baker. Glaze is adapted from Pixelated Crumb.

cake:
2 1/4 c flour
1/2 c cocoa powder
1 1/2 c sugar
1 tsp baking soda
1/4 tsp baking powder
1/2 tsp salt
1 c warm water
1/2 c + 1 tbsp canola oil
2 tsp vanilla extract
1/3 c bittersweet chocolate chips

glaze:
3/4 c powdered sugar
2 tbsp skim milk
2 tbsp smooth peanut butter
1/2 tsp vanilla extract

Preheat oven to 350° F. Coat a 9" bundt pan with cooking spray and dust with cocoa powder.

In a large bowl, whisk together flour, cocoa powder, sugar, baking soda, baking powder and salt. In a smaller bowl, whisk together water, oil and vanilla.


Add the wet ingredients to the dry ingredients and fold together until just moistened. Stir in chocolate chips, then spoon the thick batter into the prepared pan.


Bake for 30-35 minutes, until a cake tester comes out clean. Cool in the pan for ten minutes or so, then invert onto a rack to cool completely.


Once the cake is baked, whisk the glaze ingredients together in a small bowl (you may need to sift the powdered sugar to remove chunks). Pour over the top of the cake, letting it drizzle down the sides. The glaze will harden a bit after a minute or two. Serve and enjoy!

Friday, October 26, 2012

Farm Fridays: Maple Roasted Fingerling Sweet Potatoes


If you're living in the Northeast, you've probably heard that we're going to take a pounding from Hurricane Sandy (aka Frankenstorm) early next week. Some of the tracks project a direct hit to Central Jersey.  I visited the farm this morning and the grocery store this afternoon - the fridge is stocked and we're ready to hunker down and weather this thing (hopefully without losing power).


Fortunately, we got a nice load of storage vegetables from the farm today, so whatever happens, I know I'll have some unspoiled food to work with. And I could honestly eat sweet potatoes every day without getting sick of them. In fact, I couldn't wait to have these - as soon as I'd unpacked my farm basket, I scrubbed some and roasted them for lunch.

Roasting is my favorite way to prepare most vegetables. Just toss them in oil and seasonings and throw them in the oven. Very little mess or fuss is involved. In this case, I decided to add a little maple syrup to liven things up a bit. This makes an easy, delicious side dish appropriate for anything from a Friday lunch to Thanksgiving dinner. I have five more pounds of sweet potatoes sitting in the basement, so I'm sure I'll be doing this again soon!

Maple Roasted Fingerling Sweet Potatoes

1 lb fingerling sweet potatoes, sliced into 1/2" rounds (really, any kind of diced sweet potato will do, but I had these cute long ones on hand)
1 tbsp olive oil
1 tbsp maple syrup
salt and pepper to taste


Preheat oven to 400° F.

Slice up your sweet potatoes and place them in a baking dish (or foil-lined baking pan - glass will clean up more easily than metal so foil is unnecessary). Drizzle with oil and syrup, season with salt and pepper, and toss well to combine.

Roast 30-35 minutes, stirring halfway through.


Tuesday, October 23, 2012

Canning Round-Up


CNN tells me that it's National Canning Day! What a great time to do a round-up of all the canning Jeff and I have done this season. 

We began canning last summer, starting in early June with two kinds of pickles. We planned two projects for a weekend, doing one each day because it was so time-consuming. Just a year and a half later, we've found ourselves tackling three and four projects on a single Saturday morning. Clearly, our confidence has improved. We no longer need to consult instructions for some of our most frequent canning projects - I think I canned whole tomatoes on eight separate occasions this year. I've got the process down pat. In all this time, not a single jar has failed to seal for us - a huge victory in my book. We've also never had a jar go bad (knock on wood!). This year, however, we did manage to break three quart jars - two in a row last Saturday morning. There's a lesson to be learned there - if you bash a jar against the rim of the sink, even if there is no visible damage, there's probably an internal flaw that will manifest itself later (like when you're adding cold tomatoes to the heated glass). Note to self: be more careful in the future.


We have definitely been busy bees this season. I was away through July and half of August, so our canning got a late start, but once I was back in the country we were at it pretty hard nearly every weekend. Our final tally is as follows:

Classic Grape Jam: 6 half-pints
Cantaloupe Vanilla Jam: 4 4 oz jars
Pear Sauce: 2 pints, 3 half-pints and 2 4 oz jars
Heirloom Tomato Salsa: 5 pints and 8 half-pints (plus several more we've already eaten!)
Dilly Beans: 2 pints
Roasted Red Pepper Ketchup: 9 4 oz jars
Roasted Tomato and Corn Salsa: 4 half-pints
Apple Butter: 1 pint, 3 half-pints and 2 4 oz jars
Chopped Tomatoes: 3 quarts
Whole Tomatoes: 12 quarts and 3 pints
Green Tomato Pickles: 4 pints and 1 half-pint
Apple Cranberry Jam: 4 pints and 12 half-pints

I am quite impressed and pleased at the hoard of jars hiding in our basement. Hopefully we've chosen our recipes wisely, making things that will actually be consumed throughout the winter. We also should get quite a few Christmas gifts out of our stash - if you're on our list, maybe slip us some suggestions now!


Unless we develop a pressing need for more applesauce, I think our canning season is over. While I do enjoy doing this every weekend, I'm looking forward to some lazier Saturdays in the future - hopefully eating jam and salsa rather than making it. At least, until we start again next summer!