Tuesday, July 30, 2013

Raspberry Buckwheat Pancakes


A few weeks ago, I had the brilliant idea of putting berries into pancakes. Unfortunately, I had this idea while we were still in the midst of the monsoon rains of a few weeks ago. When I went to the farmer's market that Friday, there were no raspberries to be had. I was told that they didn't get a chance to pick them that morning before the rain, but to try again the next day. So the next morning, as Jeff prepared our pancake batter, I ran back over, intent on berries. No dice. It had still been too rainy.

Ever since then, I've been desperately craving raspberries. I'd seen them at the market for weeks before that, but wasn't inclined to buy them. I enjoyed the few berries we got off of our backyard bushes, and that seemed to be enough. But once this pancake idea got into my head, I had to have them. Unfortunately, as soon as I wanted raspberries, they were unavailable at the market - the berry bushes I'd been waiting for during the rains had finished for the season and the next set of berries wasn't ready yet.

This week, the raspberries are finally back! As soon as I saw them, I pounced, determined to have my pancakes. As it turns out, these were totally worth the wait. The tartness of the berries adds a huge pop of flavor to the nutty buckwheat. Add a little pecan syrup to the mix and you've got yourself an extremely tasty breakfast.

Raspberries + pancakes = deliciousness.

Raspberry Buckwheat Pancakes
Slightly adapted from Simply Recipes.

3/4 c buckwheat flour
3/4 c flour
3 tbsp sugar
1/2 tsp salt
1 tsp baking soda
3 tbsp butter, melted
1 egg
2 c buttermilk, divided
1 c raspberries (or more!)

Preheat a griddle on the stove over medium-low heat.

In a large bowl, whisk together the flours, sugar, slat and baking soda. Pour the melted butter over the dry ingredients and mix slightly. Measure out 1 c of buttermilk, add the egg and whisk well to combine. Pour into the dry mixture and stir to combine. Slowly pour in the remaining buttermilk, stirring until just incorporated. Do not overmix or you'll get tough pancakes!


Spritz your griddle with a little cooking spray.


Ladle the batter onto the griddle in 1/4 c increments, then sprinkle with raspberries (I fit about 5-7 berries per pancake). Cook about 3 minutes (until the edge of the pancake starts to bubble and can be lifted with a spatula), then flip and cook another 2-3 minutes. Add more cooking spray, if necessary, and repeat with remaining batter.

Serve with pecan syrup and garnish with extra berries.


Friday, July 26, 2013

Farm Fridays: Sauteed Kale with Bacon


My farm share has been looking pretty scanty lately. The crop loss and delayed plantings due to the eight inches of rain we had in June are finally having an impact on my basket. The quality of the produce hasn't suffered, though. I brought home two bunches of beautiful curly kale this week. One of them will be making its way into a casserole in a few days, but I decided that the rest of it ought to be used immediately, while it was still so wonderfully fresh and crisp. I had a single strip of bacon in the freezer, left over from something we made a few weeks ago, so this dish was a no-brainer.

Why is it that the dark greens - kale, spinach, collards - which are so wonderfully healthy and good go so well with bacon, which, despite its deliciousness, is one of the least healthy foods in the universe? And bacon is so efficient: cooking oil, flavor agent and meaty goodness all in one! Even better, I threw this dish together in my cast iron skillet, so that bacony flavor will be infused in future dishes. That one strip of bacon wears many hats (not to mention artery clogger and cholesterol raiser).

I'm not really trying to scare you off the bacon, though. Everything in moderation, right? It's just one strip of bacon, and its ill effects are (maybe) counteracted by the pile of vitamin- and fiber-full greens. We all want to be healthy, but we have to live a little, too. And somewhere in the midst of that compromise, my friends, this dish lies. So enjoy your bacon. And enjoy your kale.

Sauteed Kale with Bacon

1 strip thick-cut smoked bacon
1/2 onion
4 oz kale
salt and pepper to taste

Preheat a large skillet over medium heat. Add the bacon and saute 3-4 minutes, until the fat has rendered and the edges begin to crisp.


Add the onion and saute another 4-5 minutes, until softened and translucent.


Finally, add the kale (in batches, if necessary - I managed to squeeze it all into this pan at once, but it was a stretch). Cook, stirring occasionally, until wilted but still vibrantly green, about 7-8 minutes.

Wednesday, July 24, 2013

July Garden Update


Once again, I have a cautiously optimistic garden update for all of you. Cautious optimism seems to be the theme of my garden. I know some things aren't going well, but I keep plugging along anyway.

As you can see from the above picture, the most successful thing going down right now is the cucumber harvest. I grew cucumbers in this exact same spot two years ago and got nothing - just a couple scrawny little things that sat and rotted in the crisper drawer. This year, however, the cucumbers are thriving. Why? I have no idea. I'm just happy to be getting something! I've already canned a batch of dill pickle chips and another batch (just a few hours ago) of pickle relish, all from our own cucumber harvest. And, based on what I see on those vines, there will be many more lovely cucumbers to come this summer. I'm not going to question it - I'm just going to harvest them and enjoy!


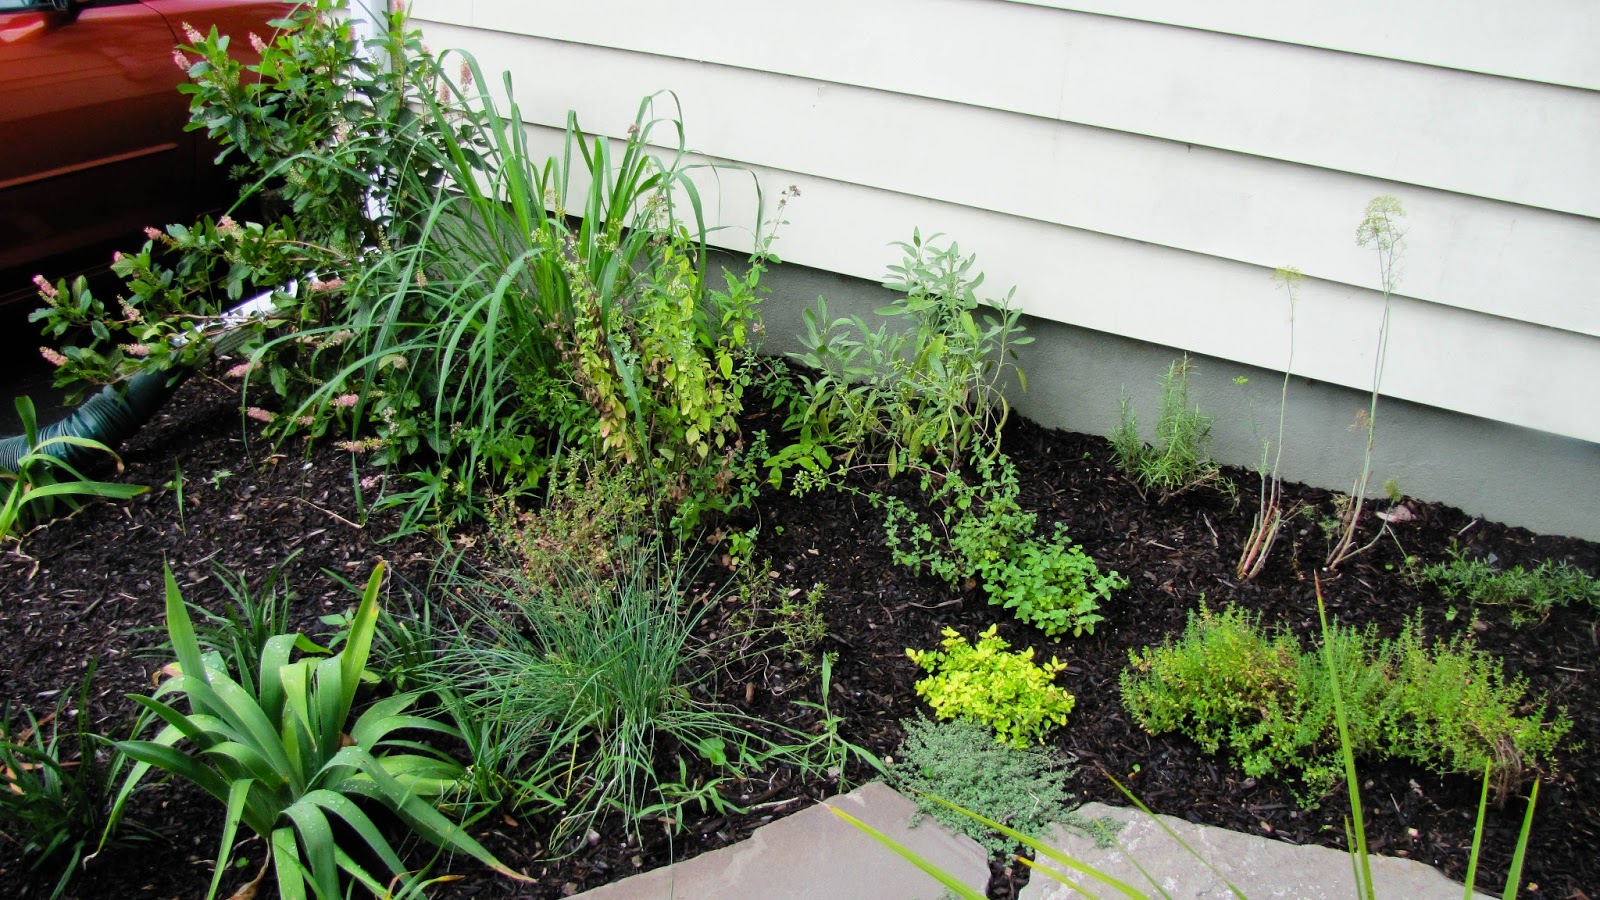
The herb garden has adapted fairly well to being moved to the front yard. The heat has taken its toll (I really should have been watering it more during that heat wave), but most things are thriving. Check out that lemongrass in the back - growing like a weed! I'm going to have to transplant it before it takes over that bush!


The only casualty of the move was my winter savory plant, which sadly died a few weeks ago. Everything else is coming along nicely and, as I said in my last post, I'm still enjoying popping out into the front yard to gather my herbs!


The old herb garden in the back hasn't been dealt with yet (except for weeding - it was totally taken over by grass until we finally got to it on Sunday). I tried to give some of those extra herbs away to neighbors and had some interest, except no one actually turned up to take them home. While I continue to try to find them homes, I'm starting my fall crops in the bare sections. I planted some small rows of turnips and radishes in the front of this patch on Sunday. It would be a great spot for greens, too, if I could get my hands on some more seeds.


The tomato plants next to the deck are finally looking awesome - they are enormously tall and are full of tiny tomatoes. Unfortunately, my tomato crop has been hit by some sort of bacterial wilting disease. It started in the raised bed, where I've lost three huge plants so far and it seems to have spread to every tomato plant in the yard. I've been trying to stave it off by removing any infected leaves that I see, but I think it's already too late for these - one of the largest branches has started to wilt. Hopefully I'll get some tomatoes off of them before they succumb. Below the tomatoes is a very lovely looking crop of carrots and another of green onions. At least something over there is going well!


Across from those, in the strawberry patch, is my one tiny tomato plant - Matt's wild cherry. The minuscule tomatoes only just began to ripen, so I don't know how they taste yet. This plant got off to a really slow, unhappy start (it still looks rather yellow at the bottom), but it's starting to surge forward again. I read that this wild variety actually reseeds itself, so we'll see what turns up on that spot next year!


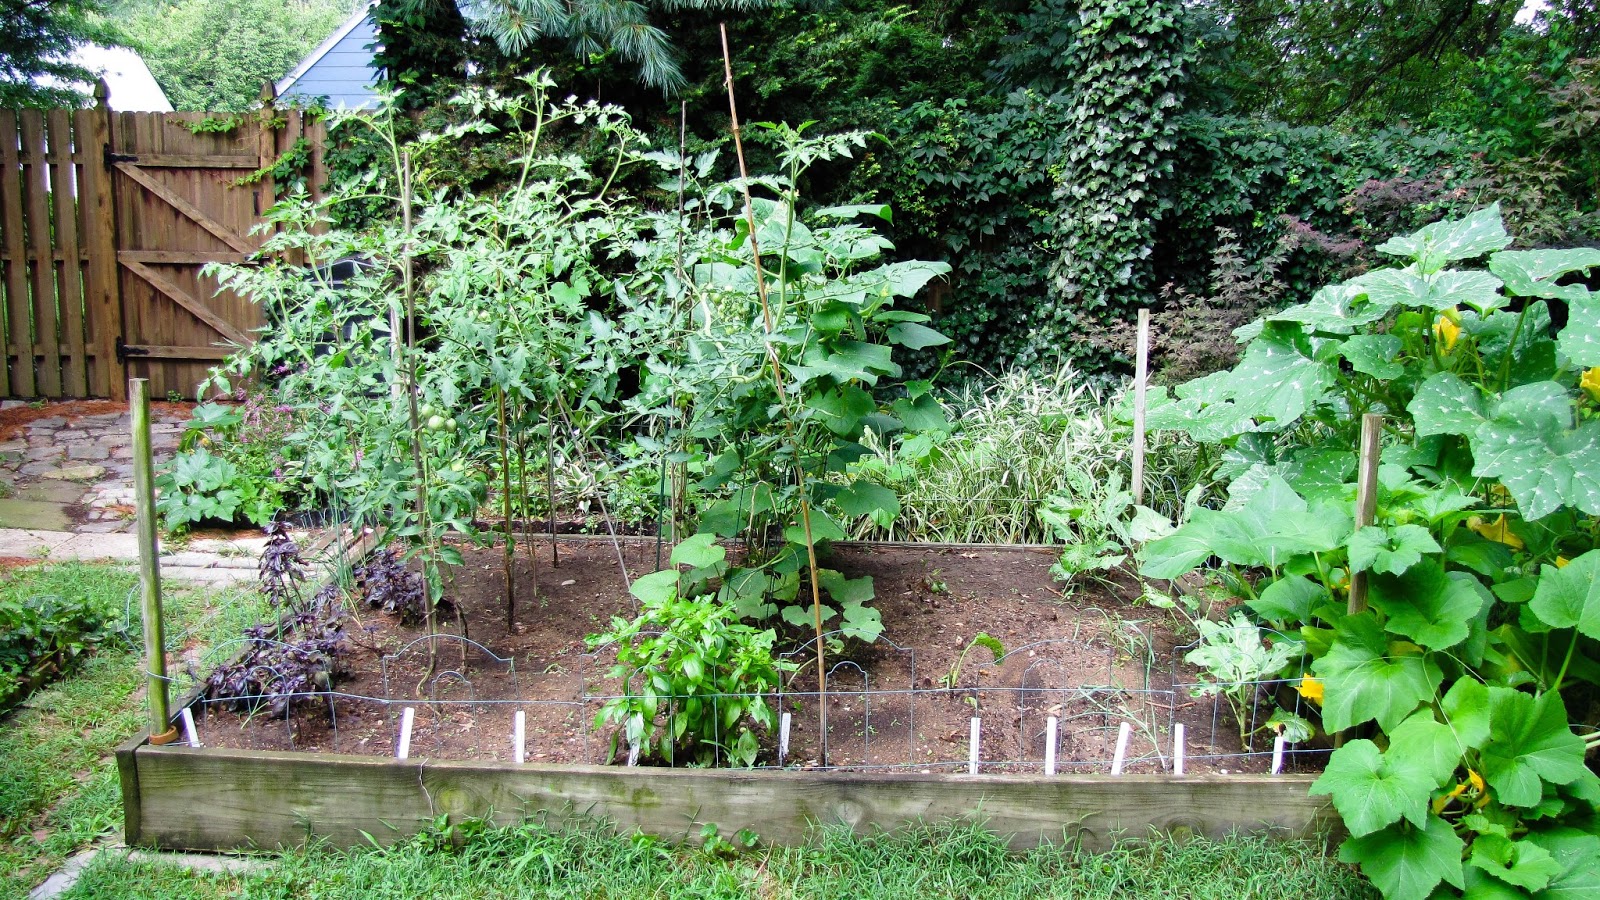
The raised bed in the back looks amazing. The tomato plants - both the four I purchased and the five "mystery" plants that came up from the compost - just shot up. Once the plants got going, they quickly surpassed my six-foot-tall bamboo stakes and started falling all over the place. Unfortunately, just as that was happening, they acquired that bacterial disease. It started with one plant mysteriously wilting, then another. Then I noticed the spotty, yellowed leaves. Now every single plant is infected. I had to remove three of the beautiful plum tomato plants.


This picture shows the scale of the single remaining plant, which was the biggest from the beginning. Check out the top of the plant in the top right of the picture, then follow the stem back to the ground - it's at least twelve feet tall, and has another branch that's nearly as big. It, too, has this infection, but I've been pulling off diseased leaves and what remains looks pretty healthy. I hope it can pull through, because it's just dripping with baby tomatoes!

The other side of the garden, apart from the cucumber vines, still has a row of collard greens. Most of my chard died in the heat wave (they never got very big anyway) and I recently pulled out my bolting arugula. I put in half a row of carrots the other day and I'll be starting more in the coming weeks.


The big news out of this area, though, is the squash patch. The difference between this picture and the one I took a month ago is amazing. The pumpkins love it over there! I have yet to see a pumpkin start to grow, but the side shoots are only just starting to spread out. There are still two giant summer squash plants under there. They are filled with blossoms and growing like weeds, but so far we haven't gotten any squash. There have been very few female flowers and the baby squashes seem to shrivel and die off right away. I don't think it's a pollination issue, because those flowers are covered with bees. I really hope the pumpkins will do better than the summer squash - those are what I'm really hoping for!


We've also acquired a few mystery squash plants in the back garden bed. Two small vines popped up and I just let them grow. Even though I only took this picture two days ago, the vine on the left is half dead right now, having succumbed to vine borers. I guess the preventative foil I wrapped around the base of the pumpkin and summer squash plants paid off, since they're all looking great. I hope the other mystery squash sticks around, because I'm curious to learn what it is and how it got over there. 


The driveway plants are still struggling. I've given up on the cucumbers in the low oval pot - it doesn't drain and they've basically drowned. The cherry tomatoes are doing ok - a bit spindly, but I've harvested some already. They, too, have the bacterial disease, but I've pulled off infected leaves and it doesn't seem to be spreading. The bucket on the right, with our single potato plant, is looking like a disappointment. I tried digging for baby potatoes a few weeks ago and found literally nothing, so I don't have high hopes. We'll see what happens when the greens die back and we dump everything out.


Let's end on a high note - the peppers in the mobile bed are finally growing! I didn't do anything - I never even tested the soil. They just began to adapt, I guess. The six Italian peppers I bought, on the right side, are actually starting to thrive. They've gone from yellow to green, are growing well and even have flowers. A few of my from seed peppers are also getting bigger, although no buds yet. I hope I at least get to try a pepper or two before the season is over. There's definitely still time - I got small pepper varieties on purpose, knowing that bell peppers often took too long to develop in the past.

So far my harvest (which I have been keeping meticulous track of) has been minuscule - eleven pounds of food, total, and nearly six pounds of those have been cucumbers. I'm crossing my fingers that there will be no more disasters and hoping for a late surge!

Friday, July 19, 2013

Farm Fridays: Scallion, Chard and Corn Pizza


Man, has it been HOT around here! I normally enjoy hot summer weather, but a heat index of 102 is outside my comfort zone. When I went to the farm, I was relieved that there wasn't much available in the pick-your-own fields. I was dripping with sweat just from picking a few dozen flowers. I feel for all the farm workers who had to be out in this weather all week. Farm work is hard on a good day - this week must have been brutal for them!

I first made this recipe a few weeks ago when Jeff was out of town, so I had it all to myself. I appreciated getting to eat it all (not in one sitting, of course), but I was also sad that I didn't get to share the wonderfulness that is awesome food. So I was happy to be able to make this again when Jeff was actually at home, so we could enjoy it together.

I also kicked things up a notch (not that any Smitten Kitchen recipe really needs alteration - but I felt like making it more of my own). I changed up the crust to a whole wheat dough with some dried basil and made it more of a pizza than a flatbread. I switched up the leeks for the scallions I picked up at the farm and added a final sprinkle of paprika over the top of the pie. The result was a really lovely summer vegetable pizza. I didn't even miss the sauce!

Be aware that this recipe makes enough dough for two pizzas - one for now and one for later!

Scallion, Chard and Corn Pizza
dough:
1 c bread flour
1 c whole wheat flour
1 1/2 tbsp dried basil
1/2 tsp salt
1/2 tsp sugar
1/4 oz instant yeast (sometimes labeled "bread machine" yeast)
3/4 c warm water (ideally 115-125° F)
1 tbsp olive oil

topping:
1 tbsp olive oil
3 large scallions (about 1 1/2 c), sliced
6 oz chard, sliced into 1/2" ribbons
1/4 tsp salt
1/4 tsp black pepper
1 ear corn, kernels sliced from cob
1/4-1/2 tsp paprika
2-3 oz goat cheese


Add the flours, basil, salt, sugar and yeast to a large bowl and whisk well to combine. Add the olive oil to the water and pour into the bowl, mixing until all dry ingredients are moistened. Knead dough for 5-8 minutes, until it forms a smooth, flexible ball (you can use a stand mixer here, but I always find the dough stays too sticky and I end up hand kneading it for a while anyway).


Cover dough and put in a warm place to rise until doubled, about 45 minutes. Meanwhile, get your pizza stone in the oven and preheat to 500° F (yes, now - when the stone preheats in the oven for a long time it gets hot enough to deliver a quick-cooked pizza with a nice crispy crust).


Shortly before the dough is fully risen, chop your vegetables. Preheat a large skillet over medium heat. Add the oil. Add the scallions to the heated oil and saute 5-6 minutes, until softened.


Add the chard and cook 2-3 minutes, until wilted, then add the corn for about a minute. Season with salt and pepper to taste.

Remove your dough from its bowl, punch down slightly and divide in half. Reserve one half of the dough for a future use (I put it in a ziplock bag and toss it in the freezer - the next pizza's a lot less work!).

Take the other half of the dough and roll and stretch it into a circle as large as your pizza stone (mine was slightly larger so the edges hung off a bit - if this happens to you, you can roll the edges slightly to create a more emphatically raised crust)


Transfer the crust to the pizza stone (if it's nice and hot, you don't need cornmeal or oil underneath - it will cook very quickly and just slide off when it's done). Spread the topping evenly over the surface of the pizza, leaving an inch or so around the edges. Sprinkle the pizza with paprika, then crumble the goat cheese over the top.

Bake 8-9 minutes, until crust is crispy and cheese turns slightly golden. Slice and enjoy!


Friday, July 12, 2013

Farm Fridays: Black Bean and Corn Salsa


Last week I was very sad to see the bottom of the last jar of salsa that we put up last fall. I absolutely adore our homemade salsa and I've been savoring it all winter long. I was saving that last jar for a rainy day, almost afraid to use it, knowing that tomato season was so far off.

(In case you haven't caught on yet, I'm a bit dramatic about food. Obviously, salsa can be purchased at the grocery store in all seasons - but that's not the salsa I crave. I have a small fear of running out of the food I like best. This same fear carries over to traveling - I rarely leave the house without some snacks, in case . . . all the stores and restaurants are closed? I don't know. Suffice to say, breaking the seal on the last remaining salsa jar was a stressful moment for me. Delicious, but stressful.)

Anyway, even though tomato season is just barely kicking off around here, I realized this week that fresh salsa season has totally begun. I got a huge bunch of cilantro from the farm last week and it got me thinking about salsa making. The black beans in my pantry started calling to me. I had never made my own black bean salsa before, but I've had it a few times and really enjoyed it, so I cracked open an old cookbook and found a recipe. This particular recipe didn't require me to go out and buy anything - I had a giant heirloom tomato (the first of this year's harvest!) and some corn from the farm this week, half a red onion in my crisper drawer, and a jalapeno and some bell pepper strips in the freezer from last fall. (The bell pepper strips are really past their flavor prime, but I hate wasting anything, so I decided to use them - this salsa will only be that much better when fresh peppers are in season!)

Salsa is always simple to make - just toss some stuff in a bowl, stir, and set aside while the flavors get to know one another. This particular salsa took a bit more of my time than usual because it makes a TON - the recipe says seven cups, but I think I used more beans than it called for. I was actually a little concerned as I made it, wondering how we were going to use so much salsa. After I tried some, though, all those thoughts went away. I've actually been eating this salsa all afternoon. I've been hard pressed to keep myself away from it. It's totally delicious, pretty as a picture, and makes an excellent healthy snack. Someone just needs to invite me to a barbecue so I have an excuse to make another giant batch!

Black Bean and Corn Salsa
Adapted from Southern Living: Secrets of the South's Best Barbecue cookbook. 

3 ears corn
1/3 c lime juice (fresh is preferable, but I used bottled juice for this one because all the limes in my refrigerator were already spoken for)
1/4 c olive oil
1 tsp salt
1/2 tsp ground cumin
1/4 tsp red pepper flakes
1/3 c cilantro, chopped
~3 c black beans (I cooked 1 c dried beans and used them all)
1/4 red onion, chopped
1 giant tomato, chopped (about 1-1 1/2 c)
1 c bell pepper, chopped (I used frozen strips of red and green peppers)
1 jalapeño, seeded and finely chopped

Bring a large pot of water to a boil. Salt well, add the corn and cook 3 minutes. Remove to an ice bath to stop the cooking process.


In a large bowl, whisk together the lime juice, oil, salt, cumin and red pepper flakes. Stir in chopped cilantro.


Slice the corn kernels off of their cobs and add to the bowl along with the beans, onion, tomato, peppers, and jalapeño. Stir well to combine, tossing with dressing.


Refrigerate for 4-8 hours to allow the flavors to meld. Enjoy!

Tuesday, July 9, 2013

Toasted Garlic, Tomato and Arugula Orecchiette


Tomato season is just about ready to get started around here. Are you ready?

By the end of the summer, we always have piles of tomatoes from the farm sitting around, so I start putting ad hoc tomato sauces on everything. But this dish isn't your run-of-the-mill pasta-and-sauce combo. It's just as easy (if not easier!) than the cherry tomato sauces I usually make, but the flavors are more focused. Toasting the garlic in the oil at the beginning lends a deep garlic flavor to the whole dish. A huge pile of ripe cherry tomatoes makes for a delightfully sweet sauce. Stirring in plenty of arugula at the end adds a peppery zing that makes this dish stand out.

Arugula season may be on the way out (most of mine has bolted by now), but I think this dish would work well with other greens, too. While spinach and chard lack the pepperiness of arugula, they would lend a lovely earthy note to the sweet tomatoes. And you can always add a little zingy black pepper at the end.

Toasted Garlic, Tomato and Arugula Orecchiette
Adapted from Lemon Fire Brigade

1/4 c olive oil
6-7 cloves garlic, thinly sliced
1/2 tsp red pepper flakes
3 c grape tomatoes, halved
3/4 lb orecchiette pasta
1/2 c reserved pasta water
3/4 c Parmesan cheese, shredded
8 c arugula
zest of 1/2 lemon
salt and pepper

Bring a large pot of well-salted water to a boil. Cook pasta according to package directions, reserving 1/2 c pasta water.


In a large saute pan, heat the oil over medium heat. Add the garlic slices and cook, stirring, until the edges begin to get golden and toasted. 


Add the tomatoes to the pan and stir well, coating the them in the garlicky oil. Add the red pepper flakes and simmer on low for about 5 minutes, until it takes on a loose saucy consistency.


Add the pasta to the pan and stir to coat with the sauce. Add some of the reserved pasta water, if necessary, to loosen the sauce up (I often find that enough water is still clinging to the pasta that I don't need my reserved water at all). Grate Parmesan over the top and stir to combine. Taste and season with salt and pepper, if necessary.


Remove from the heat and stir in the lemon zest and arugula (my skillet wasn't big enough, so I transferred the whole mixture to a mixing bowl for this part). Enjoy!

Friday, July 5, 2013

Farm Fridays: Zucchini and Garlic Scape Latkes with Creamy Basil Sauce


I'm getting the impression that this is going to be a great year for cucumbers and summer squash. I have two enormous yellow squash plants in my garden (not producing yet, but huge and vigorous) and my cucumber vines have already started churning out some big ones. We've been getting large quantities of cucumbers and squash from the farm as well.

My favorite way to eat any summer squash is to grill it (just cut it into long planks, rub with oil and season with salt and pepper). Unfortunately, the weather hasn't been very cooperative for grilling lately. It seems like every time we so much as lift a corner of the grill cover, the skies open up.  I chose this recipe as an alternative to grilling my crisper drawer full of zucchini.

I was a little trepidatious because, while Jeff and I have made latkes several times, we never seem to get it right: either they're soggy or falling apart or more egg than potato. Yet I still persist in trying new recipes, hoping we'll figure it out eventually. Jeff raised his eyebrows when I proposed this recipe, but gamely went along with it. Good thing, too, because these are probably the most successful latkes we've ever made. Perhaps our problem is with starchy potatoes, because these zucchini latkes came together like a dream. I think our success came from squeezing a ton of water out of the zucchini (one of the pictures below shows how dry we were able to get it) before we mixed the batter. That ensured the latkes weren't soggy. While they didn't crisp up like potato latkes do (when done correctly, by people other than us, that is), the flavors and textures were delicious. The basil was a stand-out flavor in both the latkes and the sauce, complementing the zucchini and garlic beautifully. Isn't it great how seasonal flavors work so well together?

Zucchini and Garlic Scape Latkes with Creamy Basil Sauce
Adapted from Sassy Radish

1 1/2 lbs zucchini
1 1/2 tsp kosher salt
scant 2/3 c flour
1/4 c basil, slivered
2 eggs, lightly beaten (the local eggs we used were very large and our latkes turned out just slightly too eggy - try not to overdo it on the egg)
2 garlic scapes, thinly sliced (about 3-4 tbsp)
1/2 tsp baking powder
1/4 tsp black pepper
olive oil

1 c Greek yogurt
1/4 c basil, slivered
zest of 1 lemon
juice of 1/2 lemon
kosher salt and black pepper to taste

Trim one end off of each zucchini then shred using a box grater (don't cut off the other end - use it as a handle and add it to the stock bag when you're done!). Transfer to a large colander and toss with salt. Position the colander over a large bowl and let sit 15 minutes.


Meanwhile, make the creamy basil sauce. Add the yogurt, basil, lemon zest and lemon juice to a small bowl and stir well to combine. Add salt and pepper to taste, stirring to combine once more. Set aside to let the flavors meld.


After 15 minutes, transfer the shredded zucchini to a clean cheesecloth or kitchen towel. Twist and squeeze well to remove as much water as possible. 

Pour enough oil into a cast iron skillet (or other large, heavy pan) to cover the bottom completely. Heat over medium-high, until shimmering.

Meanwhile, add the zucchini to a medium bowl and combine with flour, basil, eggs, garlic scapes, baking powder and pepper. Mix to form a batter.

Reduce heat to medium and drop 1/4 cupfuls of batter into the skillet, arranging them into firm patties with a fork (we fit three large latkes at a time in our 9" skillet). Gently flatten the tops and tuck in any straggly bits on the sides.


Cook 3-4 minutes, then flip gently with a spatula and cook another 3-4 minutes until golden brown and cooked through. Remove to a paper bag or paper towel-lined plate to drain while the next batches cook (this recipe made three batches for us - nine latkes in all).

Serve nice and hot with creamy basil sauce on the side!

Tuesday, July 2, 2013

Roasted Cherry Brownies

Yeah, I stole one before I took the picture. I had to make sure these were good before I blogged about them!

I had some trouble with these brownies. Specifically, I forgot to set a timer so I have no idea how long they baked for. Clearly, I was doing too many things in the kitchen at once. Normally, I have enough of a sense of time to be able to guess, but when I realized there was no timer running for these I truly had no clue how long it had been. When I examined them, I thought they might be nearly done, so I started setting the oven timer for 5-7 minutes at a time, checking them, and popping them back in the oven. After twenty plus minute of this, after they finally puffed up, I remembered what brownies look like when they're done and decided they were close. A few minutes later, I finally removed them out of sheer exhaustion. The bad news? They're a bit underdone. The good news? They're a bit underdone.

These brownies are deliciously fudgey and moist. The added moisture from the incomplete baking process is not a problem in my book. The cherries add a wonderful richness - the flavor manages to permeate most of the brownie (perhaps from the extra juice from roasting?). I take some credit here because out of the eight varieties of cherries we picked last week, I chose the richest ones for this recipe. The result is a moist, extremely chocolatey but richly fruity treat. Definitely a winner. I'm really sad I have to pack these into the freezer, since we're suffering (wink wink nudge nudge) from a surfeit of cherry-laden treats right now.

Roasted Cherry Brownies
Slightly adapted from Tracey's Culinary Adventures

2 c fresh cherries
1 1/4 c + 2 tbsp sugar, divided
5 oz bittersweet chocolate (I used my preferred chocolate chips - Ghirardelli 60% cacao)
2 oz unsweetened chocolate (I used some Scharffen Berger that I've been trying to get rid of - it's not my favorite chocolate because it has a strange fruity aftertaste, but I (correctly) assumed it would work well with actual fruit)
1/2 c butter, cut into 8 pieces
3 tbsp unsweetened cocoa powder (I used Ghirardelli)
3 eggs
2 tsp vanilla extract
1/2 tsp salt
1 c flour

Preheat oven to 450° F. Line a small baking dish with foil. 


Halve and pit the cherries, then toss with 2 tbsp sugar. Spread inside the foil-lined baking dish.


Roast the cherries 9-10 minutes until they are softened and juicy. Set aside to cool. Reduce the oven temperature to 350° F.

Meanwhile, finely chop your chocolate (chocolate chip-sized pieces are fine) and combine with the butter in a heatproof bowl set over a pot of simmering water (I prefer to bring the water to a boil first, turn off the heat, and melt the butter and chocolate with the remaining steam). Stir with a rubber spatula until the butter and chocolate have melted and are well combined. Whisk in the cocoa powder, then set aside to cool slightly.

In a large bowl, whisk together sugar, eggs, vanilla and salt. Slowly whisk in the cooled chocolate mixture until well combined. Fold in the flour with a rubber spatula, then carefully fold in cherries.


Transfer the batter to an 8 x 8" baking dish lined with foil (make sure the foil overhangs the edges for easy removal later). Bake 35-45 minutes, until tester comes out relatively clean (or leave a little underbaked, like me, and have super-fudgey brownies!). Remove to a wire rack and completely cool before cutting.